Due to covid-19 social (distancing) responsibility, a lot of people are now having to work from home (WFH). For me, this means having to connect to the company VPN for file access, remote-desktop for data visualisation on HPC, and online-only communications including frequent video calls and screen-sharing.
With a sudden spike in network traffic (from everyone WFH!), company network bandwidth can obviously become a bottleneck. However, besides bandwidth, network latency (a.k.a. ‘lag’ – which reminds me of Counter Strike Beta 6.0…) can also be a problem, e.g. for remote-desktop and screen-sharing.
From my recent WFH network activities, and partly by pure chance, I happen to stumble into —or at least to the entrance of…— the rabbit hole of home networking tweaks, including learning about something called Bufferbloat that affects latency, and how to mitigate it.
Bufferbloat
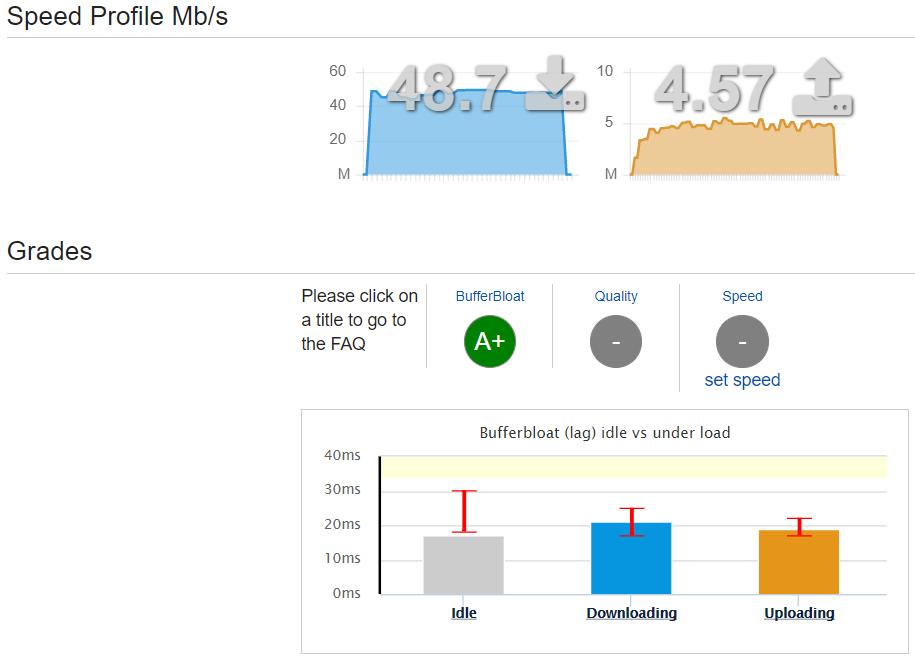
The Bufferbloat Project explains Bufferbloat as “the undesirable latency that comes from a router or other network equipment buffering too much data.” Their wiki suggests a simple measure of Bufferbloat using DSLReports Speed Test. When I ran the speed test, I got results that looked like the following:
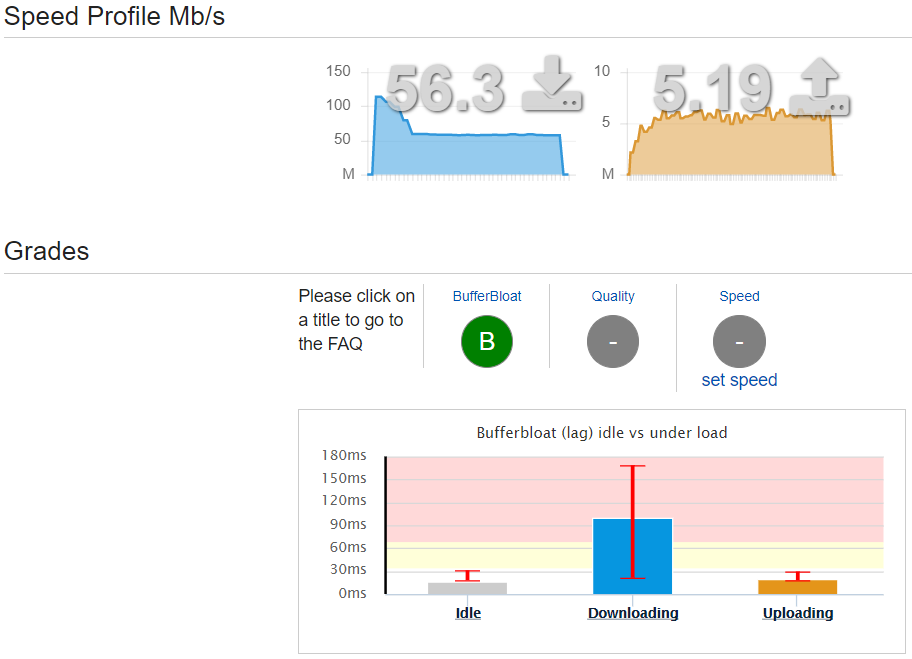
My broadband package is 50Mbit/s down, 5Mbit/s up, and so it looks like I am getting my money’s worth (extra ~10% down-link bandwidth!), but the latency seems affected by this Bufferbloat problem, where I observed occasional latencies of >200ms during the speed test:
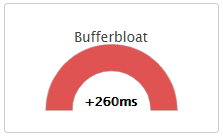
Their suggested solution is to use Smart Queue Management (SQM) in your router, but my —actually, most?— router does not have SQM, unfortunately… However, they did say that QoS (which is more widely available in routers) can help, even though it will not solve Bufferbloat completely. And so I can still give it a go~
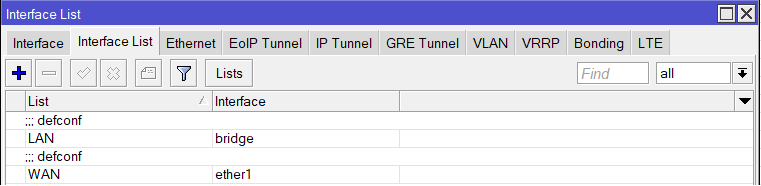
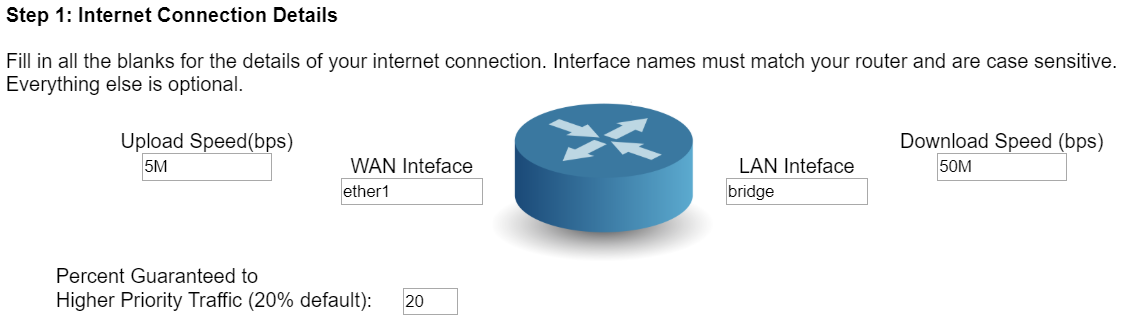
With my newly setup Mikrotik router (more on that below), a bit more Googling brought me to this nice page, where they have a simple Mikrotik QoS config tool. My internet connection details are simple enough, with just a single WAN internet connection to Mikrotik’s ether1 port, and a single bridge (for ethernet and WiFi) on the LAN interface side:
Up-link and down-link speeds seem to follow my broadband package specs (see speed test above), and so I can just use 5M and 50M on the config tool webpage:
I left the rest of the settings alone, and just downloaded the resulting script. To be safe, I had a quick look at it in a text editor, and then followed the instructions to import the config script into Mikrotik Winbox. I also had to go into IP - Firewall - Filter Rules, and removed the ‘FastTrack’ rule so that the new QoS config settings will apply, instead of being bypassed by ‘FastTrack’.
The generated config seems to use a queue type called PCQ, even though another site about lag/latency mentioned the use of a different queue type called SFQ for Bufferbloat (in the absence of the preferred SQM method). But, what the hell, they all don’t make much sense to me anyways, so I’ll just try the config I’ve got!
Then, the moment of truth. I re-ran the DLSReports Speed Test, and now it’s saying that the Bufferbloat problem is gone, with the rating improving from B to A+, though it looks like the QoS bandwidth limits have caused the speeds to reduce slightly, as a trade-off:
I have since tested a few different speed limit (approx. ±10%) settings in the QoS config, but in the end still settled on the ‘rated speeds’ for my broadband package. I also tweaked the QoS service list and protocol/port settings, to change the priorities for my own use cases, while also adding new services such as Microsoft Teams to higher priority, for video meetings etc.
Anecdotally, it seems like the overall network performance has improved with the configured Mikrotik router, and video calls on various software seem to perform well, with less ‘lag’ than before. I guess the best solution to prevent Bufferbloat is still to use a router that supports SQM e.g. via OpenWrt firmware, but the routers can be expensive, and even the more affordable ones look like they will have trade-offs in other features in an all-in-one WiFi router. Overall, I am happy to stick with the new Mikrotik, which brings us to how I started using it in the first place…
Mikrotik for home use
Even before the extra WFH traffic, my old Netgear WiFi router was already starting to act up, with its 5GHz WiFi occasionally dropping for no reason. I did a bit of research, and read that Mikrotik gear (frequently used by SOHOs) can be a cost-effective, high-performance home router. A bit more Googling led me to the Mikrotik hAP ac², which seems to fit my requirements:
- Router and WiFi access point all-in-one
- Dual-Concurrent 2.4/5GHz AP, supporting up to 802.11ac WiFi
- Five Gigabit ethernet ports for WAN and LAN-wired devices
- Small unit, with no crazy antennas, but enough coverage for a small place
- Relatively cheap for its features, c.£65 on Amazon
I found one for <£60 from an eBay seller, and went for it. Then came the fun(?) of setting it up for home networking use!
Unlike normal retail WiFi routers, this required a bit more work. For the initial setup, I pretty much just followed this great guide (thanks, Murray!). As I bought my Mikrotik from eBay, before doing anything, I did a full reset of the router. I did not have to do the “Make You Old Router Into a Modem” step, because my fibre-optic ISP-supplied router (WiFi functionality already disabled from before) can just be connected directly to the Mikrotik ethernet port 1 as the WAN connection. I did not hear any beeps (mentioned in step 2) when I powered up the Mikrotik, but I guess that differs from model to model.
Following step 3:
- I used Winbox’s Quick Set to setup the local network (step 3a) and system password (3b).
- For WiFi (3c), I only setup 5GHz WiFi, and disabled the 2.4GHz WiFi because none of the devices at home will need it.
- I also checked the 5GHz WiFi frequency ranges occupied by my neighbours, and picked a freq. range that appeared free.
- I double-checked that WPS is completely disabled, because I do not plan to use it, and it can be a bit dodgy.
- I skipped step 3d (“Internet”) because my fibre-optic broadband is already connected as WAN.
- Step 3e (“Updates”) showed that the Mikrotik I bought was already up-to-date in its firmware and packages.
- I will circle back to the setup of Guest WiFi (3f) later.
- And I skipped step 3g because I do not plan to have a VPN server running at home (plus my broadband is without static IP or port-forwarding…)
Then, I had a look at the various things mentioned in step 4. The interfaces all looked okay, and the 5GHz WiFi signal looked good even in the room furthest from the Mikrotik, which is amazing for such a small box (compared to the much bigger old Netgear!). When looking at the DHCP server, I also setup new static IPs for NAS and desktop PC (sometimes used via RDP). For DNS servers, I ran the super informative DNS benchmark tool from GRC, which confirmed that CloudFlare’s 1.1.1.1 (primary) and 1.0.0.1 (secondary) servers are my best bet, by far. The guide also recommended turning off unused IP Services to reduce attack surface, and this is where I referred to further steps (besides keeping things up-to-date) on securing the Mikrotik router, as there have been major vulnerabilities before, though mainly affecting out-of-date firmware.
I did not actually do much more for steps 5 and 6, as the default firewall rules looked okay for my use, and I am not using IPv6 for my home network. In the last section just before his Conclusion, Murray’s guide mentioned Queues and QoS. The tip given is to not use fifo queues, but to use sfq or pcq queues to prevent Bufferbloat, though without much detail. None of these meant anything to me at all, at the time..! But I looked into it further, and I think I got something useful out of it.
Isolated Guest WiFi setup
Next, I circled back to step 3f of this guide, to setup an isolated guest WiFi that sits on a different subnet IP range and prevented from accessing the LAN devices on my network. There was only a brief list of basic descriptions in the guide, and so I found another more detailed one here (thanks, Marthur!) to follow.
Marthur’s steps are pretty clear, and the setup of Virtual WiFi AP, VLAN, firewall rules, etc. were straightforward enough. The only extra thing I had to do was to create a new ‘interface list’ to include both my original LAN Bridge and the new Guest WiFi Bridge, and then modify the Firewall Mangle rules (from the QoS config script; see above) so that the QoS rules are now applied to all traffic (including to/from the new Guest WiFi). Then I just quickly hopped on to the Guest WiFi, confirmed that it has internet connectivity but no access to LAN devices, and then double-checked on Speed Test that it still honoured the QoS settings and did not cause Bufferbloat. And that’s the Guest WiFi done~!
Mikrotik automatic backup and update
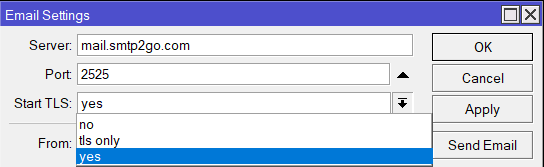
Finally, wary of potential vulnerabilities if firmware/packages go out-of-date, I found and followed this (thanks, /u/beeyev!) to setup automatic backup and update for the Mikrotik router. A quick look at the script did not throw up any obvious red flags, so I just imported it into Winbox and set it up according to the clearly commented instructions. I enabled the setting to install only patch minor version updates, and also setup auto-email whenever the script runs (scheduled for every two days). The email feature needs an SMTP server, so I just followed the recommendation and used the excellent free service on smtp2go. One small note: in Mikrotik’s Email settings, for “Start TLS” the tls_only option did not work for me, so I chose yes instead, and it all seems to work fine:
That’s all for this post. Time to get back to WFH with strange working hours…