<?xml version="1.0" encoding="utf-8"?><feed xmlns="http://www.w3.org/2005/Atom" ><generator uri="https://jekyllrb.com/" version="3.9.5">Jekyll</generator><link href="https://blog.yijin.uk/feed.xml" rel="self" type="application/atom+xml" /><link href="https://blog.yijin.uk/" rel="alternate" type="text/html" /><updated>2024-04-04T06:59:33+00:00</updated><id>https://blog.yijin.uk/feed.xml</id><title type="html">Yijin’s Writings</title><subtitle>Perhaps I should write things down more...
</subtitle><author><name>Yijin Lee</name></author><entry><title type="html">Obsolete: Old Post on Uniswap V2</title><link href="https://blog.yijin.uk/posts/uniswap-v2/" rel="alternate" type="text/html" title="Obsolete: Old Post on Uniswap V2" /><published>2021-02-15T18:00:00+00:00</published><updated>2021-02-15T18:00:00+00:00</updated><id>https://blog.yijin.uk/posts/uniswap-v2</id><content type="html" xml:base="https://blog.yijin.uk/posts/uniswap-v2/"><![CDATA[<p><a href="https://uniswap.org/">Uniswap</a> is now on v3 and beyond. This old post is now very obsolete, and thus removed to avoid misleading anyone looking for relevant info online!</p>]]></content><author><name>Yijin Lee</name></author><category term="DeFi" /><category term="Blockchain" /><category term="Crypto" /><summary type="html"><![CDATA[Uniswap V2]]></summary></entry><entry><title type="html">Using fastai2 on PEER Hub ImageNet Challenge Tasks</title><link href="https://blog.yijin.uk/posts/fastai2-phi-challenge/" rel="alternate" type="text/html" title="Using fastai2 on PEER Hub ImageNet Challenge Tasks" /><published>2020-04-13T09:00:00+00:00</published><updated>2020-04-13T09:00:00+00:00</updated><id>https://blog.yijin.uk/posts/fastai2-phi-challenge</id><content type="html" xml:base="https://blog.yijin.uk/posts/fastai2-phi-challenge/"><![CDATA[<p>In my previous <a href="/posts/fastai2-singularity/">post</a>, I described how I built a <a href="https://sylabs.io/singularity/">Singularity</a> container with an editable <a href="https://github.com/fastai/fastai2">fastai2</a> installation for use in the new iteration of their <a href="https://www.usfca.edu/data-institute/certificates/deep-learning-part-one">Deep Learning Part 1</a> course (aka ‘<a href="https://github.com/fastai/course-v4">part1-v4</a>’), which is currently on-going.</p>

<p>In this post I would like to share (and record for my own future reference!) my exploratory use of <a href="https://github.com/fastai/fastai2">fastai2</a> on a dataset/challenge that is of interest in the built environment, which is an obvious area of focus for my company <a href="https://www.arup.com">Arup</a>.</p>

<!--endexc-->

<p>The dataset is from the <a href="https://apps.peer.berkeley.edu/phichallenge/">PEER Hub ImageNet (PHI) Challenge 2018</a> <sup id="fnref:1" role="doc-noteref"><a href="#fn:1" class="footnote" rel="footnote">1</a></sup> <sup id="fnref:2" role="doc-noteref"><a href="#fn:2" class="footnote" rel="footnote">2</a></sup>, which is apparently the first image-based structural damage recognition competition, with a large image dataset (now called <a href="https://apps.peer.berkeley.edu/phi-net/">Φ-Net</a>) relevant to the field of structural engineering. <a href="https://peer.berkeley.edu/">PEER</a> designed a total of eight <a href="https://apps.peer.berkeley.edu/phichallenge/detection-tasks/">detection tasks</a> <sup id="fnref:2:1" role="doc-noteref"><a href="#fn:2" class="footnote" rel="footnote">2</a></sup> to contribute to the establishment of automated vision-based structural health monitoring. Using <a href="https://github.com/fastai/fastai2">fastai2</a>, I explored a few of these tasks, and will use Task 1 as an example in this post.</p>

<p>
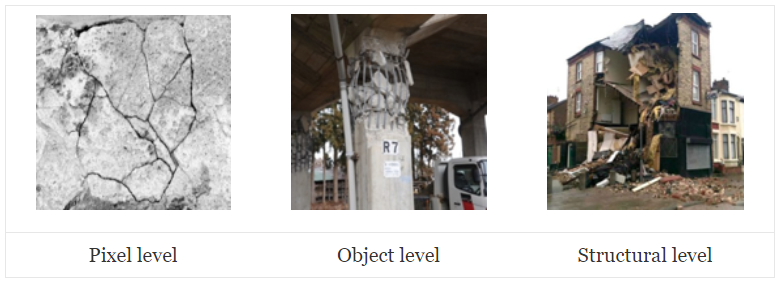
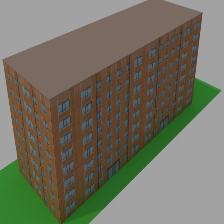
Task 1 – Scene level – Three classes (pixel/object/structural):</p>

<figure>
  <img class="image" srcset="/images/./phi/task1.PNG 2w" sizes="1.5px" src="/images/./phi/task1.PNG" />
  
</figure>

<h2 id="looking-at-the-data">Looking at the data</h2>

<p>For Task 1, <a href="https://peer.berkeley.edu/">PEER</a> provided 17424 labelled images, marked as one of the three classes – pixel/object/structural. I was not part of the original PHI Challenge back in 2018, and do not actually know how PEER provided the dataset at the time. The data that I have (courtesy of my colleagues’ entry in the PHI Challenge) is a set of <code class="language-plaintext highlighter-rouge">numpy</code> <em>.npy</em> files, which contain the bitmap <a href="https://en.wikipedia.org/wiki/RGB_color_model">RGB</a> data with standard resolution 224 × 224px, and their respective class labels. The test set images are also available (along with the <em>sample_submission.csv</em> for the original challenge entry submission), but I do not have the corresponding labels (i.e. the ‘answers’) for the test set:</p>

<div class="language-bash highlighter-rouge"><div class="highlight"><pre class="highlight"><code>ylee@hpc01 Task1 <span class="o">]</span><span class="nv">$ </span><span class="nb">ls
</span>sample_submission.csv  X_test.npy  X_train.npy  y_train.npy
</code></pre></div></div>

<p>The first thing is obviously to have a look at the data. This means loading it using <code class="language-plaintext highlighter-rouge">numpy</code>, where the shape of (17424, 224, 224, 3) indicates that it should be 17424 images of 224px sides with three channels (<a href="https://en.wikipedia.org/wiki/RGB_color_model">RGB</a>).</p>

<div class="language-python highlighter-rouge"><div class="highlight"><pre class="highlight"><code><span class="kn">import</span> <span class="nn">numpy</span> <span class="k">as</span> <span class="n">np</span>

<span class="n">data</span> <span class="o">=</span> <span class="n">np</span><span class="p">.</span><span class="n">load</span><span class="p">(</span><span class="s">'X_train.npy'</span><span class="p">)</span>
<span class="n">y</span> <span class="o">=</span> <span class="n">np</span><span class="p">.</span><span class="n">load</span><span class="p">(</span><span class="s">'y_train.npy'</span><span class="p">)</span>

<span class="k">print</span><span class="p">(</span><span class="n">data</span><span class="p">.</span><span class="n">shape</span><span class="p">,</span> <span class="n">y</span><span class="p">.</span><span class="n">shape</span><span class="p">)</span>
</code></pre></div></div>

<div class="language-plaintext highlighter-rouge"><div class="highlight"><pre class="highlight"><code>(17424, 224, 224, 3) (17424,)
</code></pre></div></div>

<p>We can confirm the image data by using <a href="https://en.wikipedia.org/wiki/Python_Imaging_Library">PIL</a> to create an image from the first item, and showing it inline in Jupyter Notebook:</p>

<div class="language-python highlighter-rouge"><div class="highlight"><pre class="highlight"><code><span class="kn">from</span> <span class="nn">PIL</span> <span class="kn">import</span> <span class="n">Image</span>

<span class="n">im</span> <span class="o">=</span> <span class="n">Image</span><span class="p">.</span><span class="n">fromarray</span><span class="p">(</span><span class="n">data</span><span class="p">[</span><span class="mi">0</span><span class="p">])</span>
<span class="n">im</span>
</code></pre></div></div>

<p><img src="/images/phi/output_5_0.png" alt="png" /></p>

<p>
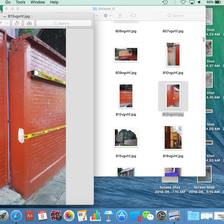
I prefer to have image data in the form of actual image files, as it makes it possible to easily look at the data just by using image viewers or thumbnail view in a file manager. <a href="https://en.wikipedia.org/wiki/Python_Imaging_Library">PIL</a> can be used to save the dataset back into bitmap <em>.bmp</em> files. I chose to output filenames in the format of <strong>num</strong>_p<strong>X</strong>.bmp, where <strong>num</strong> is the item number [0 to 17423] and <strong>X</strong> is the class ID (0 = pixel; 1 = object; 2 = structural).</p>

<div class="language-python highlighter-rouge"><div class="highlight"><pre class="highlight"><code><span class="k">for</span> <span class="n">i</span> <span class="ow">in</span> <span class="nb">range</span><span class="p">(</span><span class="nb">len</span><span class="p">(</span><span class="n">data</span><span class="p">)):</span>
    <span class="n">fname</span> <span class="o">=</span> <span class="s">'%05d_p%s.bmp'</span> <span class="o">%</span> <span class="p">(</span><span class="n">i</span><span class="p">,</span> <span class="n">y</span><span class="p">[</span><span class="n">i</span><span class="p">])</span>
    <span class="n">im</span> <span class="o">=</span> <span class="n">Image</span><span class="p">.</span><span class="n">fromarray</span><span class="p">(</span><span class="n">data</span><span class="p">[</span><span class="n">i</span><span class="p">])</span>
    <span class="n">im</span><span class="p">.</span><span class="n">save</span><span class="p">(</span><span class="n">fname</span><span class="p">)</span>
</code></pre></div></div>

<p>To make it easier for data-loading in <a href="https://github.com/fastai/fastai2">fastai2</a>, I created three subfolders and just moved the images by class into the respective folders. Incidentally, this actually made it easier later on, when I started to put in my own ‘corrections’ to the PHI training data set labels. I also quickly checked how many images there are for each class.</p>

<div class="language-bash highlighter-rouge"><div class="highlight"><pre class="highlight"><code>ylee@hpc01 bmp <span class="o">]</span><span class="nv">$ </span><span class="nb">mkdir </span>p0
ylee@hpc01 bmp <span class="o">]</span><span class="nv">$ </span><span class="nb">mv</span> <span class="k">*</span>_p0.bmp ./p0/
ylee@hpc01 bmp <span class="o">]</span><span class="nv">$ </span><span class="nb">ls</span> ./p0/ | <span class="nb">wc</span> <span class="nt">-l</span>
5879
ylee@hpc01 bmp <span class="o">]</span><span class="nv">$ </span><span class="nb">mkdir </span>p1
ylee@hpc01 bmp <span class="o">]</span><span class="nv">$ </span><span class="nb">mv</span> <span class="k">*</span>_p1.bmp ./p1/
ylee@hpc01 bmp <span class="o">]</span><span class="nv">$ </span><span class="nb">ls</span> ./p1/ | <span class="nb">wc</span> <span class="nt">-l</span>
5713
ylee@hpc01 bmp <span class="o">]</span><span class="nv">$ </span><span class="nb">mkdir </span>p2
ylee@hpc01 bmp <span class="o">]</span><span class="nv">$ </span><span class="nb">mv</span> <span class="k">*</span>_p2.bmp ./p2/
ylee@hpc01 bmp <span class="o">]</span><span class="nv">$ </span><span class="nb">ls</span> ./p2/ | <span class="nb">wc</span> <span class="nt">-l</span>
5832
</code></pre></div></div>

<p>Looks like the 17424 images were roughly evenly split into the three classes, i.e. no real need to worry about imbalanced data set. Note that the above could have been done within Python in Jupyter Notebook, but I am in the shell terminal a lot anyways, so I just did it in terminal.</p>

<p>Now that the data is in the form of <em>.bmp</em> files, with subfolders indicating their respective labels, it is straightforward to load into <a href="https://github.com/fastai/fastai2">fastai2</a>.</p>

<div class="language-python highlighter-rouge"><div class="highlight"><pre class="highlight"><code><span class="n">path</span> <span class="o">=</span> <span class="n">Path</span><span class="p">(</span><span class="s">'/data/phi_challenge/task1/bmp'</span><span class="p">)</span>

<span class="n">path</span><span class="p">.</span><span class="n">ls</span><span class="p">()</span>
</code></pre></div></div>

<div class="language-plaintext highlighter-rouge"><div class="highlight"><pre class="highlight"><code>(#3) [Path('/data/phi_challenge/task1/bmp/p0'),
Path('/data/phi_challenge/task1/bmp/p1'),
Path('/data/phi_challenge/task1/bmp/p2')]
</code></pre></div></div>

<p>Using <a href="https://github.com/fastai/fastai2">fastai2</a>’s very convenient <code class="language-plaintext highlighter-rouge">get_image_files</code> function to get all the image filenames (in this case, they are <em>.bmp</em> files):</p>

<div class="language-python highlighter-rouge"><div class="highlight"><pre class="highlight"><code><span class="n">fns</span> <span class="o">=</span> <span class="n">get_image_files</span><span class="p">(</span><span class="n">path</span><span class="p">)</span>
<span class="n">fns</span>
</code></pre></div></div>

<div class="language-plaintext highlighter-rouge"><div class="highlight"><pre class="highlight"><code>(#17424) [Path('/data/phi_challenge/task1/bmp/p0/00000_p0.bmp'),
Path('/data/phi_challenge/task1/bmp/p0/00002_p0.bmp'),
Path('/data/phi_challenge/task1/bmp/p0/00006_p0.bmp'),
Path('/data/phi_challenge/task1/bmp/p0/00007_p0.bmp'),
Path('/data/phi_challenge/task1/bmp/p0/00009_p0.bmp'),
Path('/data/phi_challenge/task1/bmp/p0/00011_p0.bmp'),
Path('/data/phi_challenge/task1/bmp/p0/00012_p0.bmp'),
Path('/data/phi_challenge/task1/bmp/p0/00016_p0.bmp'),
Path('/data/phi_challenge/task1/bmp/p0/00017_p0.bmp'),
Path('/data/phi_challenge/task1/bmp/p0/00019_p0.bmp')...]
</code></pre></div></div>

<p>Followed by another useful function, <code class="language-plaintext highlighter-rouge">verify_images</code>, to check for invalid image files. In this case, it returned zero item, i.e. all 17424 images were okay – expected, since they were written into image files by <a href="https://en.wikipedia.org/wiki/Python_Imaging_Library">PIL</a> previously!</p>

<div class="language-python highlighter-rouge"><div class="highlight"><pre class="highlight"><code><span class="n">failed</span> <span class="o">=</span> <span class="n">verify_images</span><span class="p">(</span><span class="n">fns</span><span class="p">)</span>
<span class="n">failed</span>
</code></pre></div></div>

<div class="language-plaintext highlighter-rouge"><div class="highlight"><pre class="highlight"><code>(#0) []
</code></pre></div></div>

<p>Then, I can create a <a href="https://github.com/fastai/fastai2">fastai2</a> <code class="language-plaintext highlighter-rouge">DataBlock</code> with the labelled data set. For more information on the <a href="https://github.com/fastai/fastai2">fastai2</a> <code class="language-plaintext highlighter-rouge">DataBlock</code> API, have a look at <a href="https://muellerzr.github.io/fastblog/datablock/2020/03/21/DataBlockAPI.html">this</a> great blog post from Zach Mueller.</p>

<div class="language-python highlighter-rouge"><div class="highlight"><pre class="highlight"><code><span class="n">phi1</span> <span class="o">=</span> <span class="n">DataBlock</span><span class="p">(</span>
    <span class="n">blocks</span><span class="o">=</span><span class="p">(</span><span class="n">ImageBlock</span><span class="p">,</span> <span class="n">CategoryBlock</span><span class="p">),</span> 
    <span class="n">get_items</span><span class="o">=</span><span class="n">get_image_files</span><span class="p">,</span> 
    <span class="n">splitter</span><span class="o">=</span><span class="n">RandomSplitter</span><span class="p">(</span><span class="n">valid_pct</span><span class="o">=</span><span class="mf">0.2</span><span class="p">),</span>
    <span class="n">get_y</span><span class="o">=</span><span class="n">parent_label</span><span class="p">,</span>
    <span class="n">batch_tfms</span><span class="o">=</span><span class="n">aug_transforms</span><span class="p">())</span>

<span class="n">dls</span> <span class="o">=</span> <span class="n">phi1</span><span class="p">.</span><span class="n">dataloaders</span><span class="p">(</span><span class="n">path</span><span class="p">)</span>
</code></pre></div></div>

<ul>
  <li>The <code class="language-plaintext highlighter-rouge">blocks</code> for this data set are images (independent variable) and category (dependent variable) i.e. the label.</li>
  <li>The data items can be obtained from the same <code class="language-plaintext highlighter-rouge">get_image_files</code> function used above.</li>
  <li>I used <code class="language-plaintext highlighter-rouge">RandomSplitter</code> to create a validation set with 20% of randomly chosen training data.</li>
  <li>The <code class="language-plaintext highlighter-rouge">y</code> (dependent) variable can be obtained from the subfolder name, i.e. ‘parent_label’ of the image filenames.</li>
  <li>This is just for quick exploration, so I just used the <a href="https://github.com/fastai/fastai2">fastai2</a> defaults for data augmentation, passing the transform definitions from <code class="language-plaintext highlighter-rouge">aug_transforms</code> to be applied onto the data batches.</li>
</ul>

<p>After that, a <code class="language-plaintext highlighter-rouge">DataLoader</code> (<a href="https://pytorch.org/">PyTorch</a>-style) is created from the <code class="language-plaintext highlighter-rouge">path</code> containing my data, using the <code class="language-plaintext highlighter-rouge">DataBlock</code> definition above.</p>

<p>Now I can do a quick visual check on the data, by showing a single batch of the images with their labels. The default batch size is 64, but I just need to see a few of the images to spot-check for any problem, so I asked for 16 in a batch to be shown.</p>

<div class="language-python highlighter-rouge"><div class="highlight"><pre class="highlight"><code><span class="n">dls</span><span class="p">.</span><span class="n">valid</span><span class="p">.</span><span class="n">show_batch</span><span class="p">(</span><span class="n">max_n</span><span class="o">=</span><span class="mi">16</span><span class="p">)</span>
</code></pre></div></div>

<p><img src="/images/phi/output_18_0.png" alt="png" /></p>

<p>
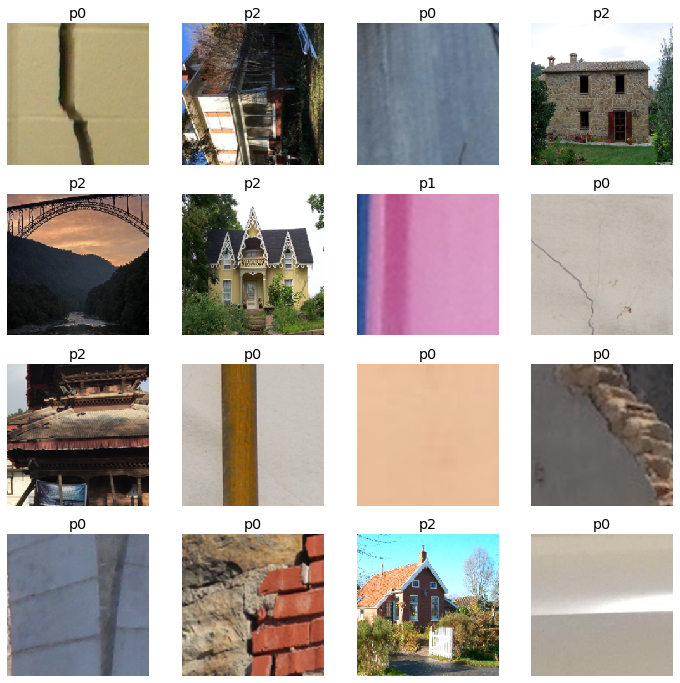
Looks reasonable, with pixel-level labelled as <em>p0</em> (e.g. a crack on a wall), object-level as <em>p1</em> (only one item shown above, looks like part of a wall/column?), and structure-level as <em>p2</em> (e.g. a whole house/building/bridge). There seems to be a <em>p2</em> image that was wrongly rotated by 90°, but I’ll just leave it for now, unless it turns out to be a problem when looking at the trained model and its predictions and interpretations later.</p>

<h2 id="create-and-train-model">Create and train model</h2>

<p>From here, it is very easy to create a standard <a href="https://en.wikipedia.org/wiki/Computer_vision">CV</a> deep learning <a href="https://en.wikipedia.org/wiki/Convolutional_neural_network">CNN</a> learner, with the <code class="language-plaintext highlighter-rouge">DataLoader</code> (defined above) and a pretrained model (i.e. the now-ubiquitous “<a href="https://en.wikipedia.org/wiki/Transfer_learning">transfer learning</a>” method). Here I used a pretrained ResNet34 model, asking for an additional KPI metric of error rate during training.</p>

<p>Then, I asked for the model to be trained and fine-tuned for five epochs, using the default <a href="https://github.com/fastai/fastai2">fastai2</a> hyperparameters without thinking too much about it (since it’s just for exploring~).</p>

<div class="language-python highlighter-rouge"><div class="highlight"><pre class="highlight"><code><span class="n">learn</span> <span class="o">=</span> <span class="n">cnn_learner</span><span class="p">(</span><span class="n">dls</span><span class="p">,</span> <span class="n">resnet34</span><span class="p">,</span> <span class="n">metrics</span><span class="o">=</span><span class="n">error_rate</span><span class="p">)</span>
<span class="n">learn</span><span class="p">.</span><span class="n">fine_tune</span><span class="p">(</span><span class="mi">5</span><span class="p">)</span>
</code></pre></div></div>

<table border="1" class="dataframe">
  <thead>
    <tr style="text-align: left;">
      <th>epoch</th>
      <th>train_loss</th>
      <th>valid_loss</th>
      <th>error_rate</th>
      <th>time</th>
    </tr>
  </thead>
  <tbody>
    <tr>
      <td>0</td>
      <td>0.522718</td>
      <td>0.320116</td>
      <td>0.124569</td>
      <td>00:32</td>
    </tr>
  </tbody>
</table>

<table border="1" class="dataframe">
  <thead>
    <tr style="text-align: left;">
      <th>epoch</th>
      <th>train_loss</th>
      <th>valid_loss</th>
      <th>error_rate</th>
      <th>time</th>
    </tr>
  </thead>
  <tbody>
    <tr>
      <td>0</td>
      <td>0.320330</td>
      <td>0.233091</td>
      <td>0.093571</td>
      <td>00:52</td>
    </tr>
    <tr>
      <td>1</td>
      <td>0.262438</td>
      <td>0.225992</td>
      <td>0.098163</td>
      <td>00:49</td>
    </tr>
    <tr>
      <td>2</td>
      <td>0.210474</td>
      <td>0.198712</td>
      <td>0.080941</td>
      <td>00:46</td>
    </tr>
    <tr>
      <td>3</td>
      <td>0.143000</td>
      <td>0.205004</td>
      <td>0.076636</td>
      <td>00:45</td>
    </tr>
    <tr>
      <td>4</td>
      <td>0.102853</td>
      <td>0.202703</td>
      <td>0.073192</td>
      <td>00:44</td>
    </tr>
  </tbody>
</table>

<p>As shown above, with just the initial training of the ‘head’ of the ResNet34 model (with the original model parameters pretrained on ImageNet), it was already achieving an error rate of just 12.5%, which is not too shabby. Note that it is recommended and sensible to first try and establish a simple ‘baseline’ for sanity check and basic benchmark, but I did not do that here (sorry!).</p>

<p>During five more epochs of fine-tuning, we can see that both training loss and validation loss continue to decrease, i.e. the model is ‘learning’ successfully. The ever-reducing validation loss indicates that the model is not quite suffering from the dreaded ‘overfitting’ yet. At the end of a total of just six epochs of training, the model has an error rate (‘judged’ on the random 20% validation set) of 7.3%, or in other words, it is 92.7% accurate in differentiating between the three classes. That’s pretty good-going, with just ~5 minutes of training (albeit on an NVIDIA Tesla V100…)!</p>

<p>I can then show the confusion matrix to see where the errors are made:</p>

<div class="language-python highlighter-rouge"><div class="highlight"><pre class="highlight"><code><span class="n">interp</span> <span class="o">=</span> <span class="n">ClassificationInterpretation</span><span class="p">.</span><span class="n">from_learner</span><span class="p">(</span><span class="n">learn</span><span class="p">)</span>
<span class="n">interp</span><span class="p">.</span><span class="n">plot_confusion_matrix</span><span class="p">()</span>
</code></pre></div></div>

<p><img src="/images/phi/output_22_1.png" alt="png" /></p>

<p>
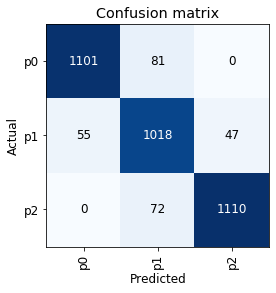
The confusion matrix looks reasonable, in that the model did not ‘skip’ a level in mistaking p0 as p2 or vice versa. As an aside, this might mean that there will not be much benefit in trying an ‘<a href="https://towardsdatascience.com/simple-trick-to-train-an-ordinal-regression-with-any-classifier-6911183d2a3c">ordinal regression</a>’ approach for this classification exercise (though it might still be worth trying, something for another time, perhaps).</p>

<p>In addition to confusion matrix, it is also useful to plot the images that gave the top losses, to see where/what the model was most inaccurate with:</p>

<div class="language-python highlighter-rouge"><div class="highlight"><pre class="highlight"><code><span class="n">interp</span><span class="p">.</span><span class="n">plot_top_losses</span><span class="p">(</span><span class="mi">36</span><span class="p">)</span>
</code></pre></div></div>

<p><img src="/images/phi/output_24_0.png" alt="png" /></p>

<p>
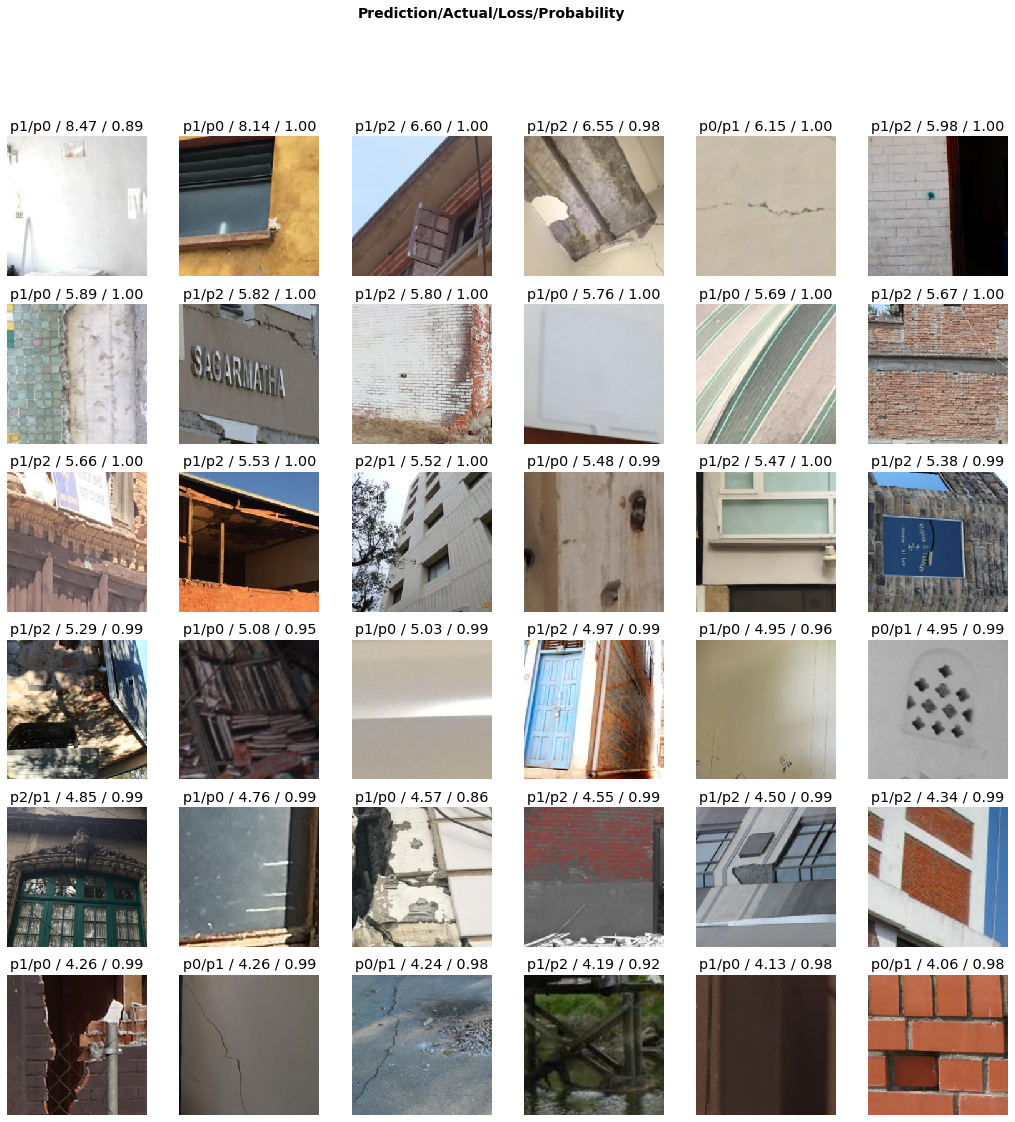
This is where I cannot say that I agree with some of the labels in the data set… For example, in the grid above, the second from right image in the first row (shown again below) is labelled p1 (i.e. object-level), but it sure looks like a p0 (i.e. pixel-level) to my human eyes, in agreement with the trained model’s prediction!</p>

<figure class="image">
  <img src="/images/phi/02740_p1.bmp" alt="p0, not p1?" />
  <figcaption>p0, not p1?</figcaption>
</figure>

<p>For cases like this, with <a href="https://github.com/fastai/fastai2">fastai2</a> it is possible to quickly ‘correct’ the data within Jupyter Notebook, taking and modifying some functions from the <a href="https://github.com/fastai/course-v4">part1-v4</a> course notebooks, which uses <a href="https://ipywidgets.readthedocs.io/en/latest/">ipywidgets</a> to provide a graphical UI for picking actions. I can call the <code class="language-plaintext highlighter-rouge">ImageClassifierCleaner</code> function on the CNN learner, and display the UI to pick the correcting ‘actions’ for images of interest:</p>

<div class="language-python highlighter-rouge"><div class="highlight"><pre class="highlight"><code><span class="n">cleaner</span> <span class="o">=</span> <span class="n">ImageClassifierCleaner</span><span class="p">(</span><span class="n">learn</span><span class="p">)</span>
<span class="n">cleaner</span>
</code></pre></div></div>

<figure>
  <img class="image" srcset="/images/./phi/cleaner.png 2w" sizes="1.5px" src="/images/./phi/cleaner.png" />
  
</figure>

<p>
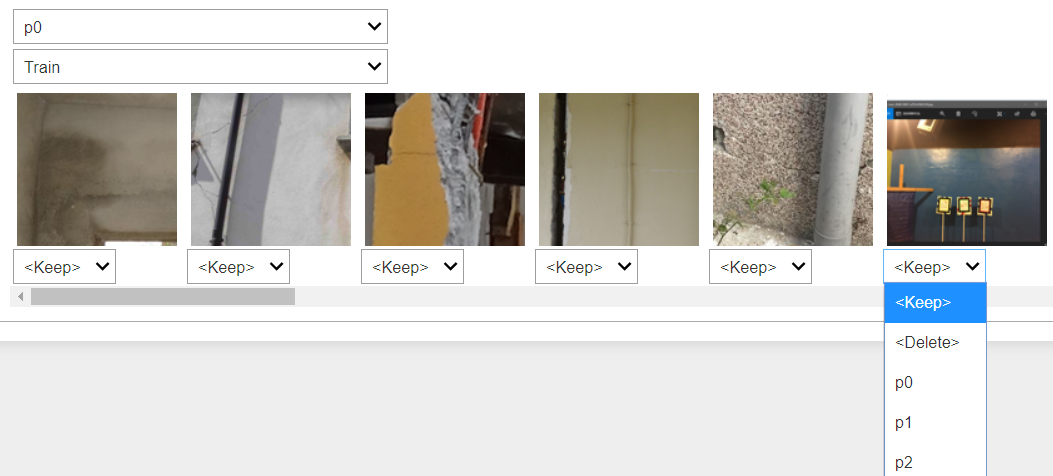
For data tracking purposes, I modified the ‘correction’ actions from the original <a href="https://github.com/fastai/course-v4">part1-v4</a> notebook, so that instead of actually deleting unwanted training data images (with the <code class="language-plaintext highlighter-rouge">unlink</code> function), it renames the unwanted <em>.bmp</em> file to <em>.deleted</em> instead, which means that when I retrain a model with the cleaned data the ‘deleted’ files will not be picked up by the <code class="language-plaintext highlighter-rouge">get_image_files</code> function (see <a href="#looking-at-the-data">above</a>). Because of the way I formed the <em>.bmp</em> filenames when writing out the original <em>.nyp</em> data into <em>.bmp</em> images, it is very easy to see which images have been discarded (i.e. renamed to <em>.deleted</em>), and which images have had their labels corrected (e.g. nnnnn_<strong>p1</strong>.bmp being moved into the <strong>p0</strong> subfolder) if I want to trace back the changes/corrections that I made.</p>

<div class="language-python highlighter-rouge"><div class="highlight"><pre class="highlight"><code><span class="k">for</span> <span class="n">idx</span> <span class="ow">in</span> <span class="n">cleaner</span><span class="p">.</span><span class="n">delete</span><span class="p">():</span>
<span class="c1">#     cleaner.fns[idx].unlink()
</span>    <span class="n">delname</span> <span class="o">=</span> <span class="s">"%s/%s.deleted"</span> <span class="o">%</span> <span class="p">(</span><span class="nb">str</span><span class="p">(</span><span class="n">cleaner</span><span class="p">.</span><span class="n">fns</span><span class="p">[</span><span class="n">idx</span><span class="p">].</span><span class="n">parent</span><span class="p">),</span> <span class="n">cleaner</span><span class="p">.</span><span class="n">fns</span><span class="p">[</span><span class="n">idx</span><span class="p">].</span><span class="n">name</span><span class="p">[:</span><span class="o">-</span><span class="mi">4</span><span class="p">])</span>
    <span class="n">shutil</span><span class="p">.</span><span class="n">move</span><span class="p">(</span><span class="nb">str</span><span class="p">(</span><span class="n">cleaner</span><span class="p">.</span><span class="n">fns</span><span class="p">[</span><span class="n">idx</span><span class="p">]),</span> <span class="n">delname</span><span class="p">)</span>
<span class="k">for</span> <span class="n">idx</span><span class="p">,</span><span class="n">cat</span> <span class="ow">in</span> <span class="n">cleaner</span><span class="p">.</span><span class="n">change</span><span class="p">():</span> <span class="n">shutil</span><span class="p">.</span><span class="n">move</span><span class="p">(</span><span class="nb">str</span><span class="p">(</span><span class="n">cleaner</span><span class="p">.</span><span class="n">fns</span><span class="p">[</span><span class="n">idx</span><span class="p">]),</span> <span class="n">path</span><span class="o">/</span><span class="n">cat</span><span class="p">)</span>
</code></pre></div></div>

<p>
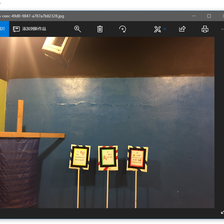
In a few rounds of quick training, plotting top losses, and running <code class="language-plaintext highlighter-rouge">ImageClassifierCleaner</code>, I ended up deleting a few images as shown below, where they look like strange computer screenshots instead of actual photos:</p>

<p><img src="/images/phi/00952_p0.bmp" alt="delete1" />
<img src="/images/phi/09183_p2.bmp" alt="delete2" />
<img src="/images/phi/14132_p0.bmp" alt="delete3" /></p>

<p>I also ‘corrected’ (by my interpretation) the labels for about 120 images, which is only ~0.7% of the data set, but I think it’s always useful to have more accurately labelled data, especially when it’s so easy to correct them within the notebooks!</p>

<h2 id="results-and-quick-comparison">Results and quick comparison</h2>

<p>After these corrections, in about 30 minutes of training across four quick experimental notebooks, the best error rate I got was around 6.6% with a pretrained ResNet50 model, or a 93.4% accuracy. Looking at <a href="https://peer.berkeley.edu/sites/default/files/2019_peer-annual-mtg-mosalam-winners.pdf">this pdf</a>, the 2018 PHI Challenge winners achieved a test set accuracy of 95% for Task 1, using ensembles of trained models. The mean accuracy for Task 1 was 89%, so my numbers (caveat below) are between the mean and the winner (closer to the winner), which is not too bad : )</p>

<p><img src="/images/phi/peerpdf.png" alt="pdf" /></p>

<p>Some thoughts on these:</p>

<ul>
  <li>For the amount of work put into these quick exploration and training, I am quite happy with the accuracy of 93% vs. the winning 95% (back in 2018), though obviously note that a difference of ~18 months is aaaaaaaages in the Deep Learning world in terms of improvements in techniques, best practices, and results metrics!</li>
  <li>To some, an accuracy difference of 2% might not sound like much, but actually, the winning entry in 2018 (5% error) is 2 <a href="https://en.wikipedia.org/wiki/Percentage_point">percentage <strong>points</strong></a> better than my 7% error, i.e. it’s 2/7 × 100 = 29 <a href="https://en.wikipedia.org/wiki/Percentage">percent</a> better!</li>
  <li>As I only have the validation-set accuracy (of 20% randomly chosen from the labelled data) and do not have the test-set ‘answers’, it is not really a like-for-like comparison with the PHI Challenge numbers, though I think it’s likely still indicative.</li>
  <li>I have only used a single ResNet model, and I am not sure whether (or how much) ensembles of models can help with my numbers, noting that ensembles seemed to have significantly boosted the PHI Challenge 2018 winning entries, so it is definitely worth looking into.</li>
  <li>I wonder if there are higher resolution images available for the same data set, and whether (or how much) that might help. I used 224 × 224px images that I had to hand, but there might be better quality, higher-resolution images available. It seems like the great people at <a href="https://peer.berkeley.edu/">PEER</a> have now made their <a href="https://apps.peer.berkeley.edu/phi-net/">Φ-Net</a> dataset available for <a href="https://apps.peer.berkeley.edu/phi-net/download/">download</a>, but I have not downloaded or looked at it yet – maybe this is the same 224px data that I already have.</li>
  <li><a href="https://github.com/fastai/fastai2">fastai2</a> has made it very easy for me to load in the data, explore the data visually, create CNN models with pretrained architectures, interpret training results, and even quickly correct mislabelled (I think) data for retraining. As always, kudos to the great people at <a href="https://www.fast.ai">fast.ai</a>, including the vibrant <a href="https://forums.fast.ai">user community</a> there.</li>
</ul>

<h3 id="citations">Citations:</h3>

<div class="footnotes" role="doc-endnotes">
  <ol>
    <li id="fn:1" role="doc-endnote">
      <p>Gao, Y. and Mosalam, K. M. (2019). PEER Hub ImageNet (Φ-Net): A large-scale multi-attribute benchmark dataset of structural images, PEER Report No.2019/07, Pacific Earthquake Engineering Research Center, University of California, Berkeley, CA. <a href="#fnref:1" class="reversefootnote" role="doc-backlink">&#8617;</a></p>
    </li>
    <li id="fn:2" role="doc-endnote">
      <p>Gao, Y., &amp; Mosalam, K. M. (2018). Deep transfer learning for image-based structural damage recognition. Computer-Aided Civil and Infrastructure Engineering, 33(9), 748-768. <a href="#fnref:2" class="reversefootnote" role="doc-backlink">&#8617;</a> <a href="#fnref:2:1" class="reversefootnote" role="doc-backlink">&#8617;<sup>2</sup></a></p>
    </li>
  </ol>
</div>]]></content><author><name>Yijin Lee</name></author><category term="fastai" /><category term="DL" /><category term="seismic" /><summary type="html"><![CDATA[How I used fastai2 to explore the PHI Challenge dataset.]]></summary></entry><entry><title type="html">Bufferbloat and Mikrotik Router</title><link href="https://blog.yijin.uk/posts/bufferbloat-mikrotik/" rel="alternate" type="text/html" title="Bufferbloat and Mikrotik Router" /><published>2020-03-29T16:00:00+00:00</published><updated>2020-03-29T16:00:00+00:00</updated><id>https://blog.yijin.uk/posts/bufferbloat-mikrotik</id><content type="html" xml:base="https://blog.yijin.uk/posts/bufferbloat-mikrotik/"><![CDATA[<p>Due to <a href="https://www.fast.ai/2020/03/09/coronavirus/">covid-19</a> social (distancing) responsibility, a lot of people are now having to work from home (WFH). For me, this means having to connect to the company <a href="https://en.wikipedia.org/wiki/Virtual_private_network">VPN</a> for file access, remote-desktop for data visualisation on <a href="https://en.wikipedia.org/wiki/High-performance_computing">HPC</a>, and online-only communications including frequent video calls and screen-sharing.</p>

<p>With a sudden spike in network traffic (from everyone WFH!), company network bandwidth can obviously become a bottleneck. However, besides bandwidth, network <a href="https://en.wikipedia.org/wiki/Latency_(engineering)#Packet-switched_networks"><em>latency</em></a> (a.k.a. ‘lag’ – which reminds me of Counter Strike Beta 6.0…) can also be a problem, e.g. for remote-desktop and screen-sharing.</p>

<p>From my recent WFH network activities, and partly by pure chance, I happen to stumble into —or at least to the entrance of…— the rabbit hole of home networking tweaks, including learning about something called <a href="https://www.bufferbloat.net/projects/">Bufferbloat</a> that affects latency, and how to mitigate it.</p>

<h3 id="bufferbloat">Bufferbloat</h3>

<p>The <a href="https://www.bufferbloat.net/projects/">Bufferbloat</a> Project explains Bufferbloat as “<em>the undesirable latency that comes from a router or other network equipment buffering too much data.</em>” Their <a href="https://www.bufferbloat.net/projects/bloat/wiki/">wiki</a> suggests a simple measure of Bufferbloat using <a href="http://www.dslreports.com/speedtest">DSLReports Speed Test</a>. When I ran the speed test, I got results that looked like the following:</p>

<figure>
  <img class="image" srcset="/images//mikrotik/speedtest_noQoS.png 2w" sizes="1.5px" src="/images//mikrotik/speedtest_noQoS.png" />
  
</figure>

<p>My broadband package is 50Mbit/s down, 5Mbit/s up, and so it <em>looks</em> like I am getting my money’s worth (extra ~10% down-link bandwidth!), but the latency seems affected by this Bufferbloat problem, where I observed occasional latencies of &gt;200ms during the speed test:</p>

<figure>
  <img class="image" srcset="/images//mikrotik/speedtest_bloat.png 2w" sizes="1.5px" src="/images//mikrotik/speedtest_bloat.png" />
  
</figure>

<p>Their <a href="https://www.bufferbloat.net/projects/bloat/wiki/What_can_I_do_about_Bufferbloat/">suggested solution</a> is to use <a href="https://www.bufferbloat.net/projects/cerowrt/wiki/Smart_Queue_Management/">Smart Queue Management</a> (SQM) in your router, but my —actually, most?— router does not have SQM, unfortunately… However, they did say that <a href="https://en.wikipedia.org/wiki/Quality_of_service">QoS</a> (which is more widely available in routers) can help, even though it <a href="https://www.bufferbloat.net/projects/bloat/wiki/More_about_Bufferbloat/#what-s-wrong-with-simply-configuring-qos">will not solve</a> Bufferbloat completely. And so I can still give it a go~</p>

<p>With my newly setup <a href="https://mikrotik.com/">Mikrotik</a> <a href="https://mikrotik.com/product/hap_ac2">router</a> (more on that <a href="#mikrotik-for-home-use">below</a>), a bit more Googling brought me to <a href="https://mikrotikconfig.com/">this</a> nice page, where they have a simple Mikrotik <a href="https://mikrotikconfig.com/qos/">QoS config</a> tool. My internet connection details are simple enough, with just a single WAN internet connection to Mikrotik’s <code class="language-plaintext highlighter-rouge">ether1</code> port, and a single <code class="language-plaintext highlighter-rouge">bridge</code> (for ethernet and WiFi) on the LAN interface side:</p>

<figure>
  <img class="image" srcset="/images//mikrotik/mikrotik_interface.png 2w" sizes="1.5px" src="/images//mikrotik/mikrotik_interface.png" />
  
</figure>

<p>Up-link and down-link speeds seem to follow my broadband package specs (see speed test above), and so I can just use <code class="language-plaintext highlighter-rouge">5M</code> and <code class="language-plaintext highlighter-rouge">50M</code> on the config tool webpage:</p>

<figure>
  <img class="image" srcset="/images//mikrotik/qos_config.png 2w" sizes="1.5px" src="/images//mikrotik/qos_config.png" />
  
</figure>

<p>I left the rest of the settings alone, and just downloaded the resulting script. To be safe, I had a quick look at it in a text editor, and then followed the instructions to import the config script into Mikrotik <a href="https://mt.lv/winbox64">Winbox</a>. I also had to go into IP - Firewall - Filter Rules, and removed the ‘FastTrack’ rule so that the new QoS config settings will apply, instead of being bypassed by ‘FastTrack’.</p>

<p>The generated config seems to use a queue type called <a href="https://wiki.mikrotik.com/wiki/Manual:Queues_-_PCQ"><em>PCQ</em></a>, even though another <a href="https://www.stoplagging.com/mikrotik-box-method/">site about lag/latency</a> mentioned the use of a different queue type called <a href="https://wiki.mikrotik.com/wiki/Manual:Queue#SFQ"><em>SFQ</em></a> for Bufferbloat (in the absence of the preferred <a href="https://www.bufferbloat.net/projects/cerowrt/wiki/Smart_Queue_Management/">SQM</a> method). But, what the hell, they all don’t make much sense to me anyways, so I’ll just try the config I’ve got!</p>

<p>Then, the moment of truth. I re-ran the <a href="http://www.dslreports.com/speedtest">DLSReports Speed Test</a>, and now it’s saying that the Bufferbloat problem is gone, with the rating improving from B to A+, though it looks like the QoS bandwidth limits have caused the speeds to reduce slightly, as a trade-off:</p>

<figure>
  <img class="image" srcset="/images//mikrotik/speedtest_pcq.png 2w" sizes="1.5px" src="/images//mikrotik/speedtest_pcq.png" />
  
</figure>

<p>I have since tested a few different speed limit (approx. ±10%) settings in the QoS config, but in the end still settled on the ‘rated speeds’ for my broadband package. I also tweaked the QoS service list and protocol/port settings, to change the priorities for my own use cases, while also adding new services such as <a href="https://docs.microsoft.com/en-us/microsoftteams/upgrade-prepare-environment-prepare-network">Microsoft Teams</a> to higher priority, for video meetings etc.</p>

<p>Anecdotally, it seems like the overall network performance has improved with the configured Mikrotik router, and video calls on various software seem to perform well, with less ‘lag’ than before. I guess the best solution to prevent Bufferbloat is still to use a router that supports <a href="https://www.bufferbloat.net/projects/cerowrt/wiki/Smart_Queue_Management/">SQM</a> e.g. via <a href="https://openwrt.org/">OpenWrt</a> firmware, but the routers can be expensive, and even the <a href="https://openwrt.org/toh/tp-link/archer-c7-1750">more affordable ones</a> look like they will have <a href="https://www.techradar.com/uk/reviews/pc-mac/networking-and-wi-fi/modem-routers/tp-link-archer-c7-ac1750-1198451/review">trade-offs</a> in other features in an all-in-one WiFi router. Overall, I am happy to stick with the new Mikrotik, which brings us to how I started using it in the first place…</p>

<h3 id="mikrotik-for-home-use">Mikrotik for home use</h3>

<p>Even before the extra WFH traffic, my old Netgear WiFi router was already starting to act up, with its 5GHz WiFi occasionally dropping for no reason. I did a bit of research, and read that <a href="https://mikrotik.com/">Mikrotik</a> gear (frequently used by <a href="https://en.wikipedia.org/wiki/Small_office/home_office">SOHO</a>s) can be a cost-effective, high-performance home router. A bit more Googling led me to the <a href="https://mikrotik.com/product/hap_ac2">Mikrotik hAP ac²</a>, which seems to fit my requirements:</p>
<ul>
  <li>Router and WiFi access point all-in-one</li>
  <li><a href="https://www.youtube.com/watch?v=_eRRab36XLI">Dual-Concurrent</a> 2.4/5GHz AP, supporting up to <a href="https://en.wikipedia.org/wiki/IEEE_802.11ac">802.11ac</a> WiFi</li>
  <li>Five Gigabit ethernet ports for <a href="https://en.wikipedia.org/wiki/Wide_area_network">WAN</a> and <a href="https://en.wikipedia.org/wiki/Local_area_network">LAN</a>-wired devices</li>
  <li>Small unit, with no crazy antennas, but enough coverage for a small place</li>
  <li>Relatively cheap for its features, c.£65 on <a href="https://www.amazon.co.uk/MikroTik-RBD52G-5HACD2HND-TC-hAP-ac2/dp/B079SD8NVQ">Amazon</a></li>
</ul>

<p>I found one for &lt;£60 from an eBay seller, and went for it. Then came the fun(?) of setting it up for home networking use!</p>

<p>Unlike normal retail WiFi routers, this required a bit more work. For the initial setup, I pretty much just followed <a href="https://blog.ligos.net/2017-02-16/Use-A-Mikrotik-As-Your-Home-Router.html">this great guide</a> (thanks, Murray!). As I bought my Mikrotik from eBay, before doing anything, I did a full reset of the router. I did not have to do the “<em>Make You Old Router Into a Modem</em>” step, because my fibre-optic ISP-supplied router (WiFi functionality already disabled from before) can just be connected directly to the Mikrotik ethernet port 1 as the WAN connection. I did not hear any beeps (mentioned in <a href="https://blog.ligos.net/2017-02-16/Use-A-Mikrotik-As-Your-Home-Router.html">step 2</a>) when I powered up the Mikrotik, but I guess that differs from model to model.</p>

<p>Following <a href="https://blog.ligos.net/2017-02-16/Use-A-Mikrotik-As-Your-Home-Router.html">step 3</a>:</p>
<ul>
  <li>I used <a href="https://mt.lv/winbox64">Winbox</a>’s Quick Set to setup the local network (step 3a) and system password (3b).</li>
  <li>For WiFi (3c), I only setup 5GHz WiFi, and disabled the 2.4GHz WiFi because none of the devices at home will need it.</li>
  <li>I also checked the 5GHz WiFi frequency ranges occupied by my neighbours, and picked a freq. range that appeared free.</li>
  <li>I double-checked that <a href="https://en.wikipedia.org/wiki/Wi-Fi_Protected_Setup#Vulnerabilities">WPS</a> is completely disabled, because I do not plan to use it, and it can be a bit <a href="https://en.wikipedia.org/wiki/Wi-Fi_Protected_Setup#Vulnerabilities">dodgy</a>.</li>
  <li>I skipped step 3d (“<em>Internet</em>”) because my fibre-optic broadband is already connected as WAN.</li>
  <li>Step 3e (“<em>Updates</em>”) showed that the Mikrotik I bought was already up-to-date in its <a href="https://mikrotik.com/download">firmware and packages</a>.</li>
  <li>I will circle back to the setup of Guest WiFi (3f) later.</li>
  <li>And I skipped step 3g because I do not plan to have a VPN server running at home (plus my broadband is without static IP or port-forwarding…)</li>
</ul>

<p>Then, I had a look at the various things mentioned in <a href="https://blog.ligos.net/2017-02-16/Use-A-Mikrotik-As-Your-Home-Router.html">step 4</a>. The interfaces all looked okay, and the 5GHz WiFi signal looked good even in the room furthest from the Mikrotik, which is amazing for such a small box (compared to the much bigger old Netgear!). When looking at the DHCP server, I also setup new static IPs for <a href="https://en.wikipedia.org/wiki/Network-attached_storage">NAS</a> and desktop PC (sometimes used via <a href="https://en.wikipedia.org/wiki/Remote_Desktop_Protocol">RDP</a>). For DNS servers, I ran the super informative <a href="https://www.grc.com/dns/benchmark.htm">DNS benchmark tool from GRC</a>, which confirmed that <a href="https://1.1.1.1/">CloudFlare</a>’s 1.1.1.1 (primary) and 1.0.0.1 (secondary) servers are my best bet, by far. The <a href="https://blog.ligos.net/2017-02-16/Use-A-Mikrotik-As-Your-Home-Router.html">guide</a> also recommended turning off unused IP Services to reduce attack surface, and this is where I referred to <a href="https://wiki.mikrotik.com/wiki/Manual:Securing_Your_Router">further steps</a> (besides keeping things up-to-date) on securing the Mikrotik router, as there have been <a href="https://www.cvedetails.com/vulnerability-list/vendor_id-12508/product_id-23641/Mikrotik-Routeros.html">major vulnerabilities</a> before, though mainly affecting out-of-date firmware.</p>

<p>I did not actually do much more for <a href="https://blog.ligos.net/2017-02-16/Use-A-Mikrotik-As-Your-Home-Router.html">steps 5 and 6</a>, as the default firewall rules looked okay for my use, and I am not using IPv6 for my home network. In the last section just before his Conclusion, Murray’s <a href="https://blog.ligos.net/2017-02-16/Use-A-Mikrotik-As-Your-Home-Router.html">guide</a> mentioned <a href="https://wiki.mikrotik.com/wiki/Manual:Queue">Queues</a> and <a href="https://en.wikipedia.org/wiki/Quality_of_service">QoS</a>. The tip given is to not use <em>fifo</em> queues, but to use <em>sfq</em> or <em>pcq</em> queues to prevent <a href="https://www.bufferbloat.net/projects/">Bufferbloat</a>, though without much detail. None of these meant anything to me at all, at the time..! But I looked into it further, and I <em>think</em> I got <a href="#bufferbloat">something useful</a> out of it.</p>

<h3 id="isolated-guest-wifi-setup">Isolated Guest WiFi setup</h3>

<p>Next, I circled back to step 3f of <a href="https://blog.ligos.net/2017-02-16/Use-A-Mikrotik-As-Your-Home-Router.html">this guide</a>, to setup an isolated guest WiFi that sits on a different subnet IP range and prevented from accessing the LAN devices on my network. There was only a brief list of basic descriptions in the <a href="https://blog.ligos.net/2017-02-16/Use-A-Mikrotik-As-Your-Home-Router.html">guide</a>, and so I found another more detailed one <a href="https://www.marthur.com/networking/mikrotik-setup-guest-vlan-wifi/2582/">here</a> (thanks, Marthur!) to follow.</p>

<p><a href="https://www.marthur.com/networking/mikrotik-setup-guest-vlan-wifi/2582/">Marthur</a>’s steps are pretty clear, and the setup of Virtual WiFi AP, VLAN, firewall rules, etc. were straightforward enough. The only extra thing I had to do was to create a new ‘<a href="https://wiki.mikrotik.com/wiki/Manual:Interface/List">interface list</a>’ to include both my original LAN Bridge and the new Guest WiFi Bridge, and then modify the <a href="https://wiki.mikrotik.com/wiki/Manual:IP/Firewall/Mangle">Firewall Mangle</a> rules (from the <a href="https://mikrotikconfig.com/">QoS config</a> script; see <a href="#bufferbloat">above</a>) so that the QoS rules are now applied to all traffic (including to/from the new Guest WiFi). Then I just quickly hopped on to the Guest WiFi, confirmed that it has internet connectivity but no access to LAN devices, and then double-checked on <a href="http://www.dslreports.com/speedtest">Speed Test</a> that it still honoured the QoS settings and did not cause <a href="#bufferbloat">Bufferbloat</a>. And that’s the Guest WiFi done~!</p>

<h3 id="mikrotik-automatic-backup-and-update">Mikrotik automatic backup and update</h3>

<p>Finally, wary of potential <a href="https://www.cvedetails.com/vulnerability-list/vendor_id-12508/product_id-23641/Mikrotik-Routeros.html">vulnerabilities</a> if firmware/packages go out-of-date, I found and followed <a href="https://www.reddit.com/r/mikrotik/comments/ercpzb/mikrotik_routeros_automatic_backup_and_update/">this</a> (thanks, <em>/u/beeyev</em>!) to setup automatic backup and update for the Mikrotik router. A quick look at the <a href="https://github.com/beeyev/Mikrotik-RouterOS-automatic-backup-and-update">script</a> did not throw up any obvious red flags, so I just imported it into <a href="https://mt.lv/winbox64">Winbox</a> and set it up according to the clearly commented instructions. I enabled the setting to install only <em>patch</em> minor version updates, and also setup auto-email whenever the script runs (scheduled for every two days). The email feature needs an <a href="https://en.wikipedia.org/wiki/Simple_Mail_Transfer_Protocol">SMTP</a> server, so I just followed the recommendation and used the excellent free service on <a href="https://smtp2go.com/">smtp2go</a>. One small note: in Mikrotik’s <a href="https://wiki.mikrotik.com/wiki/Manual:Tools/email">Email</a> settings, for “Start TLS” the <code class="language-plaintext highlighter-rouge">tls_only</code> option did not work for me, so I chose <code class="language-plaintext highlighter-rouge">yes</code> instead, and it all seems to work fine:</p>

<figure>
  <img class="image" srcset="/images//mikrotik/email_tls.png 2w" sizes="1.5px" src="/images//mikrotik/email_tls.png" />
  
</figure>

<p>That’s all for this post. Time to get back to WFH with strange working hours…</p>]]></content><author><name>Yijin Lee</name></author><category term="networking" /><category term="WFH" /><summary type="html"><![CDATA[Learning about home networking and preventing Bufferbloat with better QoS in Mikrotik router.]]></summary></entry><entry><title type="html">fastai2 in Singularity Container</title><link href="https://blog.yijin.uk/posts/fastai2-singularity/" rel="alternate" type="text/html" title="fastai2 in Singularity Container" /><published>2020-03-26T18:00:00+00:00</published><updated>2020-03-26T18:00:00+00:00</updated><id>https://blog.yijin.uk/posts/fastai2-singularity</id><content type="html" xml:base="https://blog.yijin.uk/posts/fastai2-singularity/"><![CDATA[<p>The awesome people at <a href="https://www.fast.ai">fast.ai</a> started the 2020 iteration (aka ‘<a href="https://github.com/fastai/course-v4">part1-v4</a>’) of their wildly popular <a href="https://www.usfca.edu/data-institute/certificates/deep-learning-part-one">Deep Learning Part I</a> course earlier this month, running it entirely online because of <a href="https://www.fast.ai/2020/03/09/coronavirus/">covid-19</a> social (distancing) responsibility.</p>

<p>The course is using the brand new fastai v2 library (<a href="https://github.com/fastai/fastai2">fastai2</a>, currently in pre-release) along with <a href="https://pytorch.org/">PyTorch</a>, and makes a start in covering the content of their upcoming <a href="https://www.oreilly.com/library/view/deep-learning-for/9781492045519/">book</a>.</p>

<p>Installation of the fastai v2 library can be pretty straightforward using <code class="language-plaintext highlighter-rouge">conda</code> and <code class="language-plaintext highlighter-rouge">pip</code>. It is also well-supported on various cloud GPU platforms such as <a href="https://www.paperspace.com/">Paperspace</a> and <a href="https://colab.research.google.com/">Colab</a>. However, as with many other cutting-edge deep learning software stacks that typically involve quite frequent updates and changes (for bugfixes, performance enhancements, etc.), it can be a challenge to have everything setup in a multi-user <a href="https://en.wikipedia.org/wiki/High-performance_computing">HPC</a> environment, without the risk of affecting other users’ software packages needed for production work.</p>

<p><a href="https://en.wikipedia.org/wiki/OS-level_virtualization">Containerisation</a> technology presents a possible solution to these challenges, by enabling self-contained (hah!) containers that can be built and deployed with all the internally consistent dependencies, without affecting other parts of the host system or other containers. <a href="https://www.docker.com">Docker</a> is arguably the most well-known container system right now, but it might not necessarily be the best for a multi-user HPC environment used for projects and production —instead of experimentation— work, as it can be difficult to setup and ensure the correct user/group permissions in the host system are replicated and honoured in Docker containers. There also seems to be potential risk of undesired <a href="https://www.hackingarticles.in/docker-privilege-escalation/">privilege escalation</a> to <code class="language-plaintext highlighter-rouge">root</code> access due to the way that the Docker daemon works, which is again a problem for multi-user production HPC.</p>

<p>My quick search showed that a different container system, <a href="https://sylabs.io/singularity/">Singularity</a>, might be better-suited for my use case above. The article <a href="https://pythonspeed.com/articles/containers-filesystem-data-processing/">here</a> helpfully describes some of the problems in Docker defaults that can be solved by Singularity. Even though I do not have <code class="language-plaintext highlighter-rouge">sudo</code> permission on the multi-user HPC, I am able to build Singularity containers with <a href="https://github.com/fastai/fastai2">fastai2</a> on a different machine (where I have <code class="language-plaintext highlighter-rouge">sudo</code>), e.g. a cheap and cheerful small cloud instance. And when I (and/or others) run the container on the HPC, it will <a href="https://sylabs.io/guides/3.5/user-guide/gpu.html">natively support</a> NVIDIA’s CUDA GPU compute for deep learning, honour user/group permissions and filesystem access on the HPC, and will not break or interfere with other software stacks (e.g. <a href="https://www.arup.com/dyna">finite element analysis</a> with <a href="https://en.wikipedia.org/wiki/Message_Passing_Interface">MPI</a>, and GPU-enabled <a href="https://en.wikipedia.org/wiki/Computational_fluid_dynamics">CFD</a> with a different <a href="https://developer.nvidia.com/about-cuda">CUDA</a> version) on the HPC used by other users. This gives me the flexibility of being able to experiment and tinker with the latest development version of <a href="https://github.com/fastai/fastai2">fastai2</a> (or other deep learning packages) without having <code class="language-plaintext highlighter-rouge">sudo</code> on the HPC, prepare and share Singularity containers that have functioning <a href="https://github.com/fastai/fastai2">fastai2</a> installations, while retaining the rigidity and stability needed for existing software with potentially conflicting dependencies and project-based user security permissions on the HPC.</p>

<p>I have not been experimenting with and using Singularity containers for very long yet, but I will try to describe the steps I took to build the Singularity container with an editable install (i.e. linked to an update-able Git repository) of <a href="https://github.com/fastai/fastai2">fastai2</a>.</p>

<h3 id="installing-singularity">Installing Singularity</h3>

<p>Firstly, Singularity will need to be installed by the sysadmin on the HPC by just following the <a href="https://sylabs.io/guides/3.5/user-guide/quick_start.html#quick-installation-steps">installation guide</a>. If a separate machine/instance is used to build the Singularity containers (like in my case), then Singularity needs to be installed there too, and <code class="language-plaintext highlighter-rouge">root</code> permission is needed for the container-build.</p>

<h3 id="creating-singularity-def-file">Creating Singularity <em>def</em> file</h3>

<p>Next, a Singularity <a href="https://sylabs.io/guides/3.5/user-guide/definition_files.html">definition file</a> (similar to Docker’s <em>Dockerfile</em>) is created, to have all the steps needed to build the container with the software (<a href="https://github.com/fastai/fastai2">fastai2</a> in this example) and its dependencies (e.g. <a href="https://github.com/fastai/fastai">fastai v1 library</a>, <a href="https://github.com/fastai/fastcore">fastcore</a>, etc.), plus any ancillaries (e.g. <a href="https://jupyter.org/">Jupyter Notebook</a>).</p>

<p>Singularity containers can be bootstrapped from Docker images (which are more popular and widely available), and so in the <em>def</em> file I <a href="https://sylabs.io/guides/3.5/user-guide/definition_files.html#header">start</a> with NVIDIA’s own <a href="https://hub.docker.com/r/nvidia/cuda">Docker image containing CUDA</a>:</p>
<div class="language-plaintext highlighter-rouge"><div class="highlight"><pre class="highlight"><code>BootStrap: docker
From: nvidia/cuda
</code></pre></div></div>

<p>Then, define the <a href="https://sylabs.io/guides/3.5/user-guide/definition_files.html#environment">environment</a> variables that will be set at runtime (i.e. when the container is used):</p>
<div class="language-sh highlighter-rouge"><div class="highlight"><pre class="highlight"><code>%environment
    <span class="nb">export </span><span class="nv">LANG</span><span class="o">=</span>C.UTF-8
    <span class="nb">export </span><span class="nv">PATH</span><span class="o">=</span><span class="nv">$PATH</span>:/opt/conda/bin
    <span class="nb">export </span><span class="nv">PYTHON_VERSION</span><span class="o">=</span>3.7
    <span class="nb">export </span><span class="nv">LD_LIBRARY_PATH</span><span class="o">=</span>/usr/local/nvidia/lib:/usr/local/nvidia/lib64
</code></pre></div></div>

<p>The next bit contains the steps that will be used to install <a href="https://github.com/fastai/fastai2">fastai2</a> and its dependencies, within the <a href="https://sylabs.io/guides/3.5/user-guide/definition_files.html#post"><code class="language-plaintext highlighter-rouge">%post</code></a> section of the <em>def</em> file. Again, start by defining the same environment variables, which are used also at build-time (as opposed to <em>runtime</em>, mentioned above):</p>
<div class="language-sh highlighter-rouge"><div class="highlight"><pre class="highlight"><code>%post
    <span class="nb">export </span><span class="nv">LANG</span><span class="o">=</span>C.UTF-8
    <span class="nb">export </span><span class="nv">PATH</span><span class="o">=</span><span class="nv">$PATH</span>:/opt/conda/bin
    <span class="nb">export </span><span class="nv">PYTHON_VERSION</span><span class="o">=</span>3.7
    <span class="nb">export </span><span class="nv">LD_LIBRARY_PATH</span><span class="o">=</span>/usr/local/nvidia/lib:/usr/local/nvidia/lib64
</code></pre></div></div>

<p>Then, install the software and tools needed to setup <a href="https://github.com/fastai/fastai2">fastai2</a> later on. The default OS in NVIDIA’s CUDA Docker image is Ubuntu, and so <code class="language-plaintext highlighter-rouge">apt-get</code> is used for this step. I also update <code class="language-plaintext highlighter-rouge">pip</code>, and install <a href="https://docs.conda.io/en/latest/miniconda.html"><code class="language-plaintext highlighter-rouge">miniconda</code></a>, as <code class="language-plaintext highlighter-rouge">conda</code> will be used in the next step.</p>
<div class="language-sh highlighter-rouge"><div class="highlight"><pre class="highlight"><code>    apt-get <span class="nt">-y</span> update
    apt-get <span class="nt">-y</span> <span class="nb">install</span> <span class="nt">--no-install-recommends</span> build-essential ca-certificates <span class="se">\ </span>
            git vim zip unzip curl python3-pip python3-setuptools graphviz
    apt-get clean
    <span class="nb">rm</span> <span class="nt">-rf</span> /var/lib/apt/lists/<span class="k">*</span>

    pip3 <span class="nb">install</span> <span class="nt">--upgrade</span> pip

    curl <span class="nt">-o</span> ~/miniconda.sh <span class="nt">-O</span> <span class="se">\</span>
      https://repo.continuum.io/miniconda/Miniconda3-latest-Linux-x86_64.sh <span class="se">\</span>
      <span class="o">&amp;&amp;</span> <span class="nb">chmod</span> +x ~/miniconda.sh <span class="se">\</span>
      <span class="o">&amp;&amp;</span> ~/miniconda.sh <span class="nt">-b</span> <span class="nt">-p</span> /opt/conda <span class="se">\</span>
      <span class="o">&amp;&amp;</span> <span class="nb">rm</span> ~/miniconda.sh <span class="se">\</span>
      <span class="o">&amp;&amp;</span> conda <span class="nb">install </span>conda-build
</code></pre></div></div>

<p>Next, go ahead and use <code class="language-plaintext highlighter-rouge">conda</code> to install <a href="https://github.com/fastai/fastai">fastai v1 library</a>, and while we are at it, also install <a href="https://jupyter.org/">Jupyter Notebook</a> and its extensions:</p>
<div class="language-sh highlighter-rouge"><div class="highlight"><pre class="highlight"><code>    conda update conda <span class="o">&amp;&amp;</span> conda <span class="nb">install</span> <span class="nt">-c</span> pytorch <span class="nt">-c</span> fastai fastai <span class="se">\</span>
      <span class="o">&amp;&amp;</span> conda <span class="nb">install </span>jupyter notebook <span class="se">\</span>
      <span class="o">&amp;&amp;</span> conda <span class="nb">install</span> <span class="nt">-c</span> conda-forge jupyter_contrib_nbextensions
</code></pre></div></div>

<p>As I am going to do an editable <code class="language-plaintext highlighter-rouge">pip</code> install of both <a href="https://github.com/fastai/fastai2">fastai2</a> and the <a href="https://github.com/fastai/fastcore">fastcore</a> dependency, I <code class="language-plaintext highlighter-rouge">git clone</code> the two repositories. Note that they are cloned into a shared filepath that exists on the HPC host system, so that I can choose to <code class="language-plaintext highlighter-rouge">git pull</code> update the repositories <strong>on the HPC host</strong> in future, and all the user(s) running the <a href="https://github.com/fastai/fastai2">fastai2</a> Singularity container will automatically pick up the latest updates on the editable install:</p>
<div class="language-sh highlighter-rouge"><div class="highlight"><pre class="highlight"><code>    <span class="nb">mkdir</span> <span class="nt">-p</span> /data/shared
    <span class="nb">cd</span> /data/shared <span class="o">&amp;&amp;</span> git clone https://github.com/fastai/[fastai2][fastai2] <span class="se">\</span>
    <span class="o">&amp;&amp;</span> git clone https://github.com/fastai/fastcore
</code></pre></div></div>

<p>Then, run the editable <code class="language-plaintext highlighter-rouge">pip</code> installs, as recommended currently by fastai as “<em>probably the best approach at the moment, since fastai v2 is under heavy development</em>” still:</p>
<div class="language-sh highlighter-rouge"><div class="highlight"><pre class="highlight"><code>    <span class="nb">cd</span> /data/shared/fastcore <span class="o">&amp;&amp;</span> python3.7 <span class="nt">-m</span> pip <span class="nb">install</span> <span class="nt">-e</span> <span class="s2">".[dev]"</span>
    <span class="nb">cd</span> /data/shared/[fastai2][fastai2]  <span class="o">&amp;&amp;</span> python3.7 <span class="nt">-m</span> pip <span class="nb">install</span> <span class="nt">-e</span> <span class="s2">".[dev]"</span>
</code></pre></div></div>

<p>As a final setup step, install some other libraries and packages used in the <a href="https://github.com/fastai/course-v4">part1-v4</a> fastai course:</p>
<div class="language-sh highlighter-rouge"><div class="highlight"><pre class="highlight"><code>    conda <span class="nb">install </span>pyarrow
    python3.7 <span class="nt">-m</span> pip <span class="nb">install </span>graphviz ipywidgets matplotlib nbdev&gt;<span class="o">=</span>0.2.12 <span class="se">\</span>
        pandas scikit_learn azure-cognitiveservices-search-imagesearch sentencepiece
</code></pre></div></div>

<p>With that, all the necessary installs and setup should be there. I then add the ‘<a href="https://sylabs.io/guides/3.5/user-guide/definition_files.html#startscript">start script</a>’ that will be executed when the Singularity container is started. In this case:</p>
<ul>
  <li>Start the Jupyter Notebook server</li>
  <li>Make it accessible to other computers/IP (firewalled to internal network only, in our case)</li>
  <li>Have the server listen to a non-default port of 9999 (Jupyter default is 8888)</li>
  <li>Give it a password hash for access (in this case, the hash corresponds to password <em>fastai</em>)</li>
  <li>Make it start in the shared filepath on the HPC host system where I cloned the <a href="https://github.com/fastai/fastai2">fastai2</a> and <a href="https://github.com/fastai/fastcore">fastcore</a>  repositories. This is also where I have other shared files needed (e.g. the <a href="https://github.com/fastai/course-v4">part1-v4</a> course material)</li>
</ul>

<div class="language-plaintext highlighter-rouge"><div class="highlight"><pre class="highlight"><code>%startscript
    jupyter notebook --ip=0.0.0.0 --port=9999 --no-browser \
        --NotebookApp.password='sha1:a60ff295d0b9:506732d050d4f50bfac9b6d6f37ea6b86348f4ed' \
        --log-level=WARN --notebook-dir=/data/shared/ &amp;
</code></pre></div></div>

<p>Finish the <em>def</em> file by adding some basic label and descriptions:</p>
<div class="language-plaintext highlighter-rouge"><div class="highlight"><pre class="highlight"><code>%labels
    ABOUT container for fastai2 (dev editable install) with jupyter notebook on startup (port 9999), for March 2020 fastai course
    AUTHOR Yijin Lee
</code></pre></div></div>

<p>The complete example <em>def</em> file explained above can be found <a href="https://github.com/yijinlee/fastai2-def">here</a>.</p>

<h3 id="building-the-singularity-container">Building the Singularity container</h3>

<p>With the <em>def</em> file, I can now build the Singularity container to get the resulting container <em>sif</em> file. I needed <code class="language-plaintext highlighter-rouge">sudo</code> or <code class="language-plaintext highlighter-rouge">root</code> permission for this, and so I used a cheap AWS instance (t2.small), instead of the HPC environment (where I only have basic user permissions). My AWS instance only has limited <code class="language-plaintext highlighter-rouge">/</code> root device file space, and so I set an environment variable for Singularity to use a different AWS block device storage as the temp directory (or else the build will fail):</p>
<div class="language-bash highlighter-rouge"><div class="highlight"><pre class="highlight"><code>root@aws-t2:~# <span class="nb">export </span><span class="nv">TMPDIR</span><span class="o">=</span>/blockdevice/tmp
root@aws-t2:~# <span class="nb">ls
</span>fastai2.def
root@aws-t2:~# singularity build fastai2.sif fastai2.def
</code></pre></div></div>

<p>With the Singularity build, the requested <em>sif</em> file will be created. It is quite a big file, at around 5.0GB, but I only really needed to build and transfer it once, since it will contain an editable (and thus update-able) install of <a href="https://github.com/fastai/fastai2">fastai2</a>:</p>
<div class="language-bash highlighter-rouge"><div class="highlight"><pre class="highlight"><code>root@aws-t2:~# <span class="nb">ls</span> <span class="nt">-lh</span>
<span class="nt">-rw-r--r--</span> 1 root   root   1.9K Mar 25 12:00 fastai2.def
<span class="nt">-rwxr-xr-x</span> 1 root   root   5.0G Mar 25 12:30 fastai2.sif
</code></pre></div></div>

<p>The <em>sif</em> file can then be copied/transferred to the HPC environment for actual use.</p>

<h3 id="running-the-singularity-container">Running the Singularity container</h3>

<p>As I want to use NVIDIA GPU for deep learning compute, the HPC where I run the <a href="https://github.com/fastai/fastai2">fastai2</a> Singularity container needs to have the correct NVIDIA GPU <a href="https://www.nvidia.com/Download/index.aspx">drivers</a> installed (by the sysadmin). Note that the only hard requirement is the drivers — CUDA and other dependencies are self-contained in our Singularity <em>sif</em> file already, all with the correct versions. I can check the NVIDIA GPU status by running <code class="language-plaintext highlighter-rouge">nvidia-smi</code>:</p>
<div class="language-sh highlighter-rouge"><div class="highlight"><pre class="highlight"><code><span class="o">[</span>ylee@hpc01 shared]<span class="nv">$ </span>nvidia-smi
Thu Mar 25 13:00:00 2020
+-----------------------------------------------------------------------------+
| NVIDIA-SMI 440.33.01    Driver Version: 440.33.01    CUDA Version: 10.2     |
|-------------------------------+----------------------+----------------------+
| GPU  Name        Persistence-M| Bus-Id        Disp.A | Volatile Uncorr. ECC |
| Fan  Temp  Perf  Pwr:Usage/Cap|         Memory-Usage | GPU-Util  Compute M. |
|<span class="o">===============================</span>+<span class="o">======================</span>+<span class="o">======================</span>|
|   0  Tesla V100-PCIE...  Off  | 00000000:37:00.0 Off |                    0 |
| N/A   53C    P0    30W / 250W |     14MiB / 16160MiB |      0%      Default |
+-------------------------------+----------------------+----------------------+

+-----------------------------------------------------------------------------+
| Processes:                                                       GPU Memory |
|  GPU       PID   Type   Process name                             Usage      |
|<span class="o">=============================================================================</span>|
|    0      2468      G   Xorg                                          14MiB |
+-----------------------------------------------------------------------------+
</code></pre></div></div>

<p>I will start the Singularity container from the shared filepath where the necessary files (e.g. <a href="https://github.com/fastai/fastai2">fastai2</a> and <a href="https://github.com/fastai/fastcore">fastcore</a> repositories, <a href="https://github.com/fastai/course-v4">part1-v4</a> course material, etc.) reside — this was mentioned above. In my case, this is in <code class="language-plaintext highlighter-rouge">/data/shared</code>, and my <em>sif</em> file is in <code class="language-plaintext highlighter-rouge">/data/shared/singularity</code>:</p>
<div class="language-sh highlighter-rouge"><div class="highlight"><pre class="highlight"><code><span class="o">[</span>ylee@hpc01 shared]<span class="nv">$ </span><span class="nb">pwd</span>
/data/shared
<span class="o">[</span>ylee@hpc01 shared]<span class="nv">$ </span>singularity instance start <span class="nt">--nv</span> ./singularity/fastai2.sif fastai2
INFO:    instance started successfully
<span class="o">[</span>ylee@hpc01 shared]<span class="nv">$ </span>singularity instance list
INSTANCE NAME    PID      IMAGE
fastai2          13579    /data/shared/singularity/fastai2.sif
</code></pre></div></div>

<p>The <code class="language-plaintext highlighter-rouge">--nv</code> flag above is for <a href="https://sylabs.io/guides/3.5/user-guide/gpu.html#nvidia-gpus-cuda">Singularity</a> to be able to <a href="https://docs.nvidia.com/ngc/ngc-user-guide/singularity.html#running-the-singularity-container">leverage NVIDIA GPU</a>.</p>

<p>Because of the ‘startscript’ defined in the <em>def</em> file, there should now be a Jupyter Notebook server running and listening on port 9999:</p>
<div class="language-sh highlighter-rouge"><div class="highlight"><pre class="highlight"><code><span class="o">[</span>ylee@hpc01 shared]<span class="nv">$ </span>netstat <span class="nt">-plunt</span>
<span class="o">(</span>Not all processes could be identified, non-owned process info
 will not be shown, you would have to be root to see it all.<span class="o">)</span>
Active Internet connections <span class="o">(</span>only servers<span class="o">)</span>
Proto Recv-Q Send-Q Local Address           Foreign Address         State       PID/Program name
tcp        0      0 0.0.0.0:9999            0.0.0.0:<span class="k">*</span>               LISTEN      13579/python
</code></pre></div></div>

<p>I can thus point a web browser to the IP at port 9999, and enter the password (defined as <em>fastai</em> in the hash within our <em>def</em> file) to access Jupyter Notebook.</p>

<p>I can also run a <a href="https://sylabs.io/guides/3.5/user-guide/cli/singularity_shell.html">shell</a> within the Singularity container instance, to start interactive Python directly, without going via Jupyter Notebook:</p>
<div class="language-sh highlighter-rouge"><div class="highlight"><pre class="highlight"><code><span class="o">[</span>ylee@hpc01 shared]<span class="nv">$ </span>singularity shell instance://fastai2
Singularity fastai2.sif:/data/shared&gt; python3.7
Python 3.7.6 <span class="o">(</span>default, Jan  8 2020, 19:59:22<span class="o">)</span>
<span class="o">[</span>GCC 7.3.0] :: Anaconda, Inc. on linux
Type <span class="s2">"help"</span>, <span class="s2">"copyright"</span>, <span class="s2">"credits"</span> or <span class="s2">"license"</span> <span class="k">for </span>more information.
</code></pre></div></div>

<p>From within Python, I can also quickly confirm that <a href="https://github.com/fastai/fastai2">fastai2</a> is indeed installed, and CUDA compute is available for <a href="https://pytorch.org/">PyTorch</a>:</p>
<div class="language-python highlighter-rouge"><div class="highlight"><pre class="highlight"><code><span class="o">&gt;&gt;&gt;</span> <span class="kn">from</span> <span class="nn">fastai2.vision.all</span> <span class="kn">import</span> <span class="o">*</span>
<span class="o">&gt;&gt;&gt;</span> <span class="n">torch</span><span class="p">.</span><span class="n">cuda</span><span class="p">.</span><span class="n">is_available</span><span class="p">()</span>
<span class="bp">True</span>
</code></pre></div></div>

<p>And, because the container has an editable <code class="language-plaintext highlighter-rouge">pip</code> install of <a href="https://github.com/fastai/fastai2">fastai2</a> residing on the HPC host system, I can <code class="language-plaintext highlighter-rouge">git pull</code> or <code class="language-plaintext highlighter-rouge">git checkout</code> to a specific <a href="https://github.com/fastai/fastai2">fastai2</a> commit from the HPC, and all users of the Singularity container will then ‘get’ the corresponding <a href="https://github.com/fastai/fastai2">fastai2</a> version. For example, starting with a slightly older version (0.0.14):</p>
<div class="language-python highlighter-rouge"><div class="highlight"><pre class="highlight"><code><span class="o">&gt;&gt;&gt;</span> <span class="kn">import</span> <span class="nn">fastai2</span>
<span class="o">&gt;&gt;&gt;</span> <span class="n">fastai2</span><span class="p">.</span><span class="n">__version__</span>
<span class="p">...</span>
<span class="s">'0.0.14'</span>
<span class="o">&gt;&gt;&gt;</span> <span class="nb">exit</span><span class="p">()</span>
</code></pre></div></div>

<p>I can exit from the Singularity instance shell to get back to the HPC host system, while leaving the container still running. I then change the <a href="https://github.com/fastai/fastai2">fastai2</a> version (e.g. update to the latest via <code class="language-plaintext highlighter-rouge">git pull</code>), and the change will be ‘live’ back in the Singularity instance shell.</p>
<div class="language-sh highlighter-rouge"><div class="highlight"><pre class="highlight"><code>Singularity fastai2.sif:/data/shared&gt; <span class="nb">exit
exit</span>
<span class="o">[</span>ylee@hpc01 shared]<span class="nv">$ </span><span class="nb">cd </span>fastai2
<span class="o">[</span>ylee@hpc01 fastai2]<span class="nv">$ </span>git pull
<span class="nb">.</span>
<span class="o">[</span>ylee@hpc01 fastai2]<span class="nv">$ </span><span class="nb">cd</span> ..
<span class="o">[</span>ylee@hpc01 shared]<span class="nv">$ </span>singularity shell instance://fastai2
Singularity fastai2.sif:/data/shared&gt; python3.7
Python 3.7.6 <span class="o">(</span>default, Jan  8 2020, 19:59:22<span class="o">)</span>
<span class="o">[</span>GCC 7.3.0] :: Anaconda, Inc. on linux
Type <span class="s2">"help"</span>, <span class="s2">"copyright"</span>, <span class="s2">"credits"</span> or <span class="s2">"license"</span> <span class="k">for </span>more information.
<span class="o">&gt;&gt;&gt;</span> import fastai2
<span class="o">&gt;&gt;&gt;</span> fastai2.__version__
<span class="s1">'0.0.16'</span>
</code></pre></div></div>

<p>All the shared filesystem files (e.g. <em>ipynb</em> notebooks) can be accessed from within the container, retaining the original user/group permissions, without having to do/set anything for Singularity. When done, just stop the running container:</p>
<div class="language-sh highlighter-rouge"><div class="highlight"><pre class="highlight"><code><span class="o">[</span>ylee@hpc01 shared]<span class="nv">$ </span>singularity instance stop fastai2
Killing fastai2 instance of /data/shared/singularity/fastai2.sif <span class="o">(</span><span class="nv">PID</span><span class="o">=</span>13579<span class="o">)</span> <span class="o">(</span>Timeout<span class="o">)</span>
</code></pre></div></div>

<h3 id="summary">Summary</h3>

<p>Without getting <code class="language-plaintext highlighter-rouge">sudo</code> or <code class="language-plaintext highlighter-rouge">root</code> permission on a production HPC cluster, I can define and build a Singularity container on a separate cheap cloud instance (where <code class="language-plaintext highlighter-rouge">root</code> is available), which can have a <code class="language-plaintext highlighter-rouge">pip</code> editable install of <a href="https://github.com/fastai/fastai2">fastai2</a>.</p>

<p>The resulting container <em>sif</em> file can be used on the HPC cluster, have native access to GPU CUDA compute, easily retain user/group permissions in the multi-user HPC environment, and have all the necessary software stack dependencies (except NVIDIA GPU driver, which must be present on the HPC host system) without messing up or interfering with other software stacks or environments on the HPC host system.</p>

<p>The editable install residing on the HPC host filesystem means that I can easily upgrade/change the version of <a href="https://github.com/fastai/fastai2">fastai2</a> via <code class="language-plaintext highlighter-rouge">git</code>, and users of the Singularity container can get the corresponding version changes ‘live’. This allows a ‘balance’ of having flexibility to experiment with software stacks in a multi-user production HPC environment with native user/group permissions, while reducing the risks of messing things up for everyone (e.g. via undesired <code class="language-plaintext highlighter-rouge">root</code> privilege escalation that can happen in Docker). It also means that other users can all re(use) the same container with the same versions of software stack, e.g. for a fastai study group.</p>

<p>My Singularity example <em>def</em> file explained above can be found <a href="https://github.com/yijinlee/fastai2-def">here</a>. And please do join us for lively discussions on the <a href="https://forums.fast.ai/">fastai forums</a>.</p>]]></content><author><name>Yijin Lee</name></author><category term="fastai" /><category term="DL" /><category term="singularity" /><category term="containerisation" /><summary type="html"><![CDATA[How I built a Singularity container with editable fastai2 installation for multi-user HPC environment.]]></summary></entry><entry><title type="html">Coding Post</title><link href="https://blog.yijin.uk/posts/coding-post-test/" rel="alternate" type="text/html" title="Coding Post" /><published>2020-01-23T19:07:00+00:00</published><updated>2020-01-23T19:07:00+00:00</updated><id>https://blog.yijin.uk/posts/coding-post-test</id><content type="html" xml:base="https://blog.yijin.uk/posts/coding-post-test/"><![CDATA[<p>A plug for <a href="https://www.oasys-software.com/dyna/training/training-courses/introduction-to-java-script/">JavaScript API</a> in <a href="https://www.arup.com/dyna">Oasys LS-DYNA Environment</a>.</p>

<div class="language-javascript highlighter-rouge"><div class="highlight"><pre class="highlight"><code><span class="kd">var</span> <span class="nx">m</span> <span class="o">=</span> <span class="k">new</span> <span class="nx">Model</span><span class="p">();</span>
<span class="kd">var</span> <span class="nx">n</span> <span class="o">=</span> <span class="nx">Node</span><span class="p">.</span><span class="nx">First</span><span class="p">(</span><span class="nx">m</span><span class="p">);</span> 
<span class="nx">m</span><span class="p">.</span><span class="nx">UpdateGraphics</span><span class="p">();</span>
</code></pre></div></div>]]></content><author><name>Yijin Lee</name></author><category term="JavaScript" /><summary type="html"><![CDATA[An example post which shows code rendering.]]></summary></entry><entry><title type="html">Hello, Dunia</title><link href="https://blog.yijin.uk/posts/hello-dunia/" rel="alternate" type="text/html" title="Hello, Dunia" /><published>2020-01-23T19:00:00+00:00</published><updated>2020-01-23T19:00:00+00:00</updated><id>https://blog.yijin.uk/posts/hello-dunia</id><content type="html" xml:base="https://blog.yijin.uk/posts/hello-dunia/"><![CDATA[<p>Just testing out Jekyll for blog : )</p>

<p><img src="https://i.redd.it/5l0c8sn0uic41.jpg" alt="cat image" width="200px" /></p>

<p>Check out the <a href="https://jekyllrb.com/docs/home">Jekyll docs</a> for more info on how to get the most out of Jekyll. File all bugs/feature requests at <a href="https://github.com/jekyll/jekyll">Jekyll’s GitHub repo</a>. If you have questions, you can ask them on <a href="https://talk.jekyllrb.com/">Jekyll Talk</a>.</p>]]></content><author><name>Yijin Lee</name></author><summary type="html"><![CDATA[Just testing out Jekyll for blog : )]]></summary></entry></feed>